Beginnerland
Skill Builder: Seaming (Part One)
Let’s be honest: patterns do a pretty lousy job with the finishing instructions and these crucial skills are so often skipped over in knitting lessons.
Also, the nomenclature gets a bit silly, which can make things harder to look up. It’s never been clear to me if “mattress stitch” is only for one of the key three methods—or all of them. And I’m still not sure what to call the needle we use for this…darning needle? Yarn needle? Tapestry needle?
Never fear, names aside, I’m here to make things clearer and simpler for you!
The first step: Always block before doing any seaming; this is so that the fabric is tidy and even, and has settled to its finished shape and size. As per my blocking article, don’t pin the pieces out, it doesn’t matter if the edges are rolling a bit. Just wash and dry.
The last step: Always weave in the ends after sewing up—if they’re long enough, you can use them for seaming. (The traditional advice about not seaming with cast on and bind-off tails is because it can be harder to unpick the seams and unravel everything. But if you don’t expect to, don’t worry about it.)
In between, sew some seams! Consult the pattern for the order in which they should be done: for a sweater, generally it’s shoulder seams first, then attach the sleeve to the body, and finally sew up sleeve and side seams.
There are three seaming methods and they work for all fabrics and stitch patterns. Which method you use depends on how the fabrics are aligned: are you joining side edges, top and/or bottom edges, or one of each?
I’ll cover side edges in this column, the other two in the next.
Side-to-Side Seam
Lie the two pieces side-by-side with right sides up. Yes, always work with the right sides facing.
Thread a blunt-ended, large-eyed needle with a length of yarn and/or your tail. You don’t have to use your project yarn: if it’s slubby, highly textured, or loosely spun, it might be annoying. It’s ok to seam with something smoother, as long as it’s a similar-ish weight—certainly not thicker! —and a similar-ish color—definitely not darker as it might show through!
You’re going to be working in the columns beside the edge stitch; not in the middle of that stitch.
This means that it doesn’t matter if your edge stitches are slightly untidy. They usually are, and it’s not a problem at all! Whatever you do, do NOT slip the first stitch of a row. Although it makes the edges look tidier, it makes them much harder to seam neatly. For more on this, give this a read.

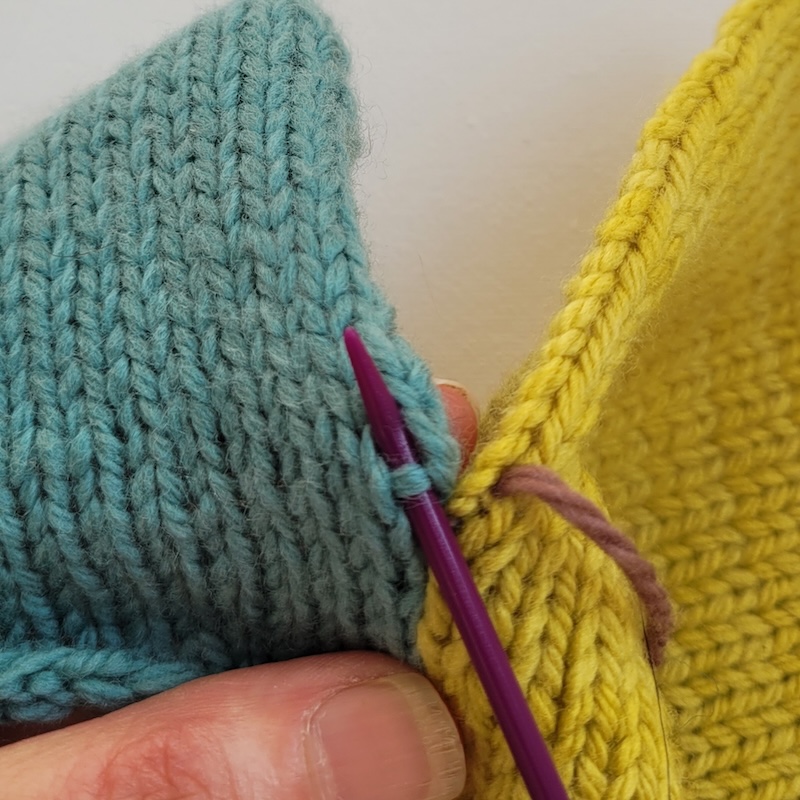
So tidy! Also invisible, even though I am using a different colored yarn.
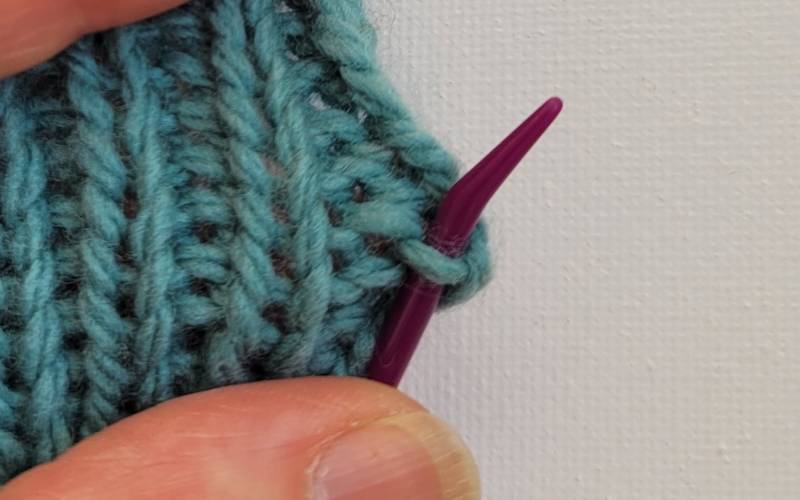
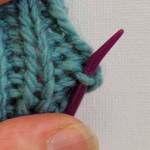
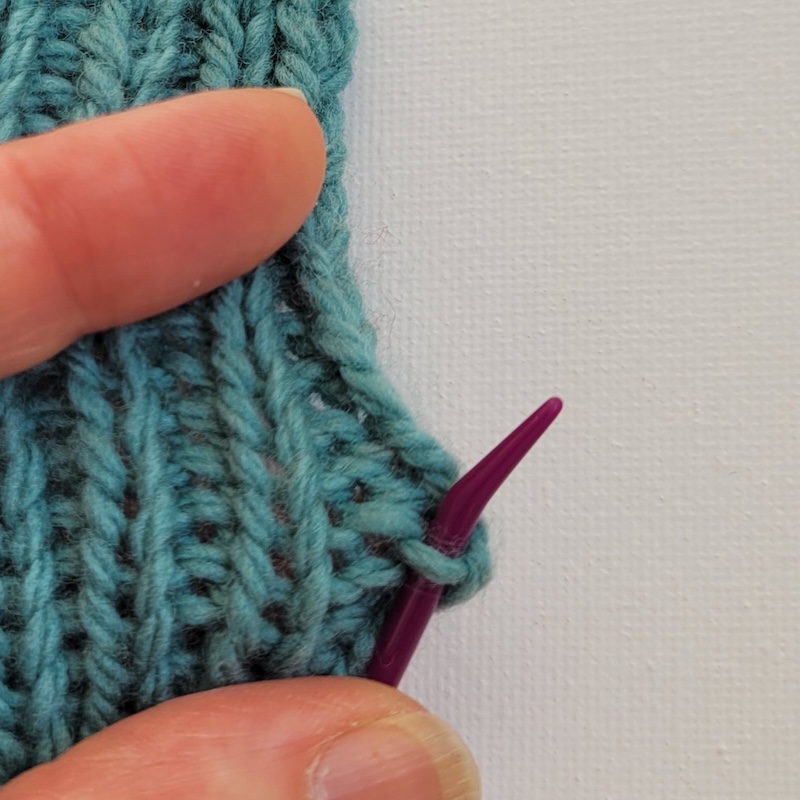
With your yarn needle, work back and forth, grabbing the horizontal bar that runs between the edge stitch and its neighbor. Grab a bar, go over to the other side, grab the corresponding bar on the other side, and then back again, back and forth. Every few rows, snug things up, pulling so it’s fully closed up and firm. Don’t pull right to the top, leave yourself a bit of a gap as you’re working.
This is the bar you’re looking for.
Controversy alert! Do you grab one bar, or two? Honestly, it depends on how thick your yarn is: for sock to light worsted weight yarns, I’m going to grab two at a time; for thicker ones, I’ll grab one.
And that’s it. No knots needed, either at the top or the bottom! At the top, leave yourself about 3″ (8 cm) or so of tail, for weaving in; if you’re using a separate length of yarn, do the same at the start.
If you’re sewing together two sides that have exactly the same number of rows (like a sleeve seam), it all magically works out.
But if you’re joining two separate pieces, there might be a little bit of fudging (or as the sewists call it, “easing”) to be done. I use removable stitch markers to clip the pieces together before I start seaming. (Straight pins just fall out.)
You’re establishing milestones, to make sure you’re lined up in all the right places. If one piece is a row or two longer than the other, then just take an extra bar on one side here or there, guided by your clips.
If it goes wrong or you don’t like how it looks? It’s the easiest thing in the world to undo: no need to unpick, just tug on the yarn.
The amazing thing about this technique is that it works exactly the same way on pretty much any fabric. That horizontal bar is always there: look at reverse stockinette stitch.
Ribbing is just the same! If you’re working (k2, p2) ribbing, and the row starts and ends with k2, then it’s actually exactly like stockinette stitch.
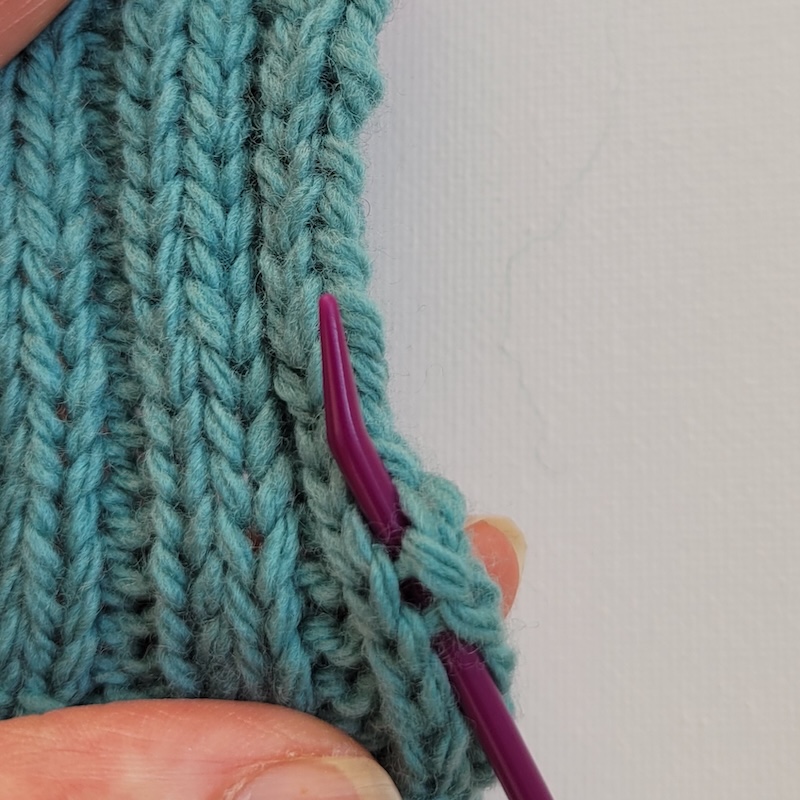
Look for the bar between the two knit stitches, just like stockinette stitch.
For (k1, p1) ribbing, the bar sits between the knit stitch and the purl bump.
The bar is between the v of the knit stitch and the “umbrella” bump of the purl stitch.
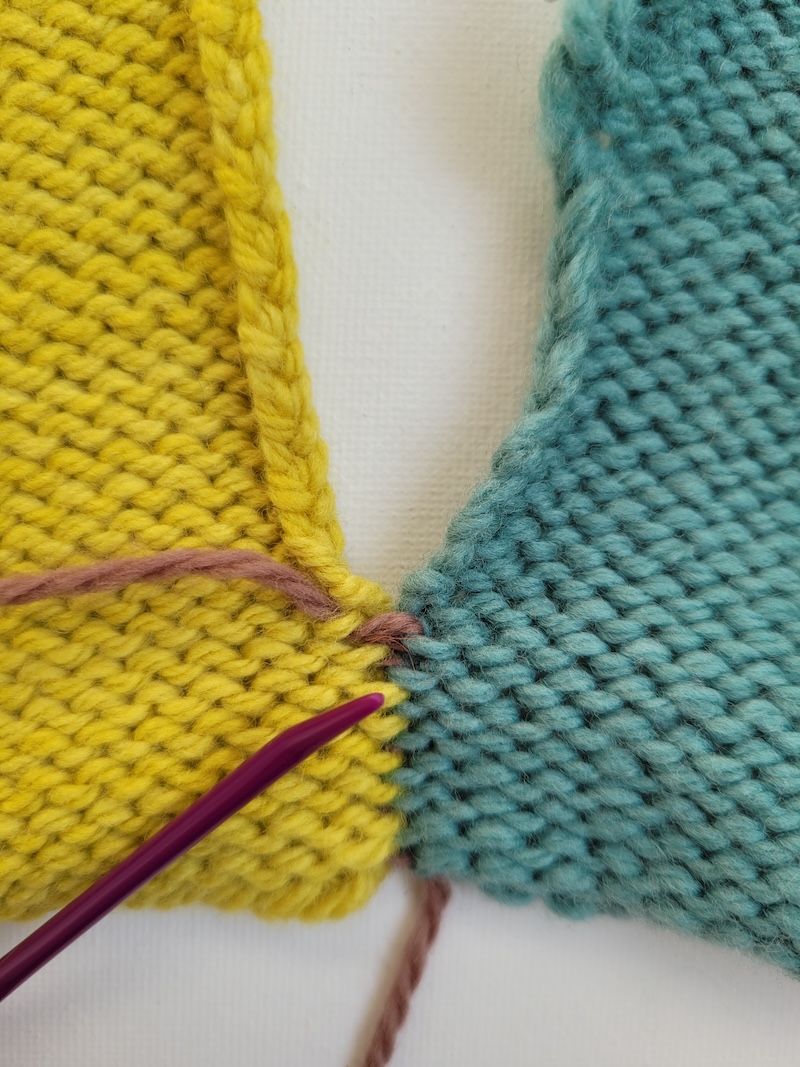
There is one exception: With garter stitch, you’ve got two choices: using exactly this method makes a firm and stable seam for garments. But if you’re making a blanket, it’s flatter and more reversible if you just work back and forth into the ridge bump at the edges.
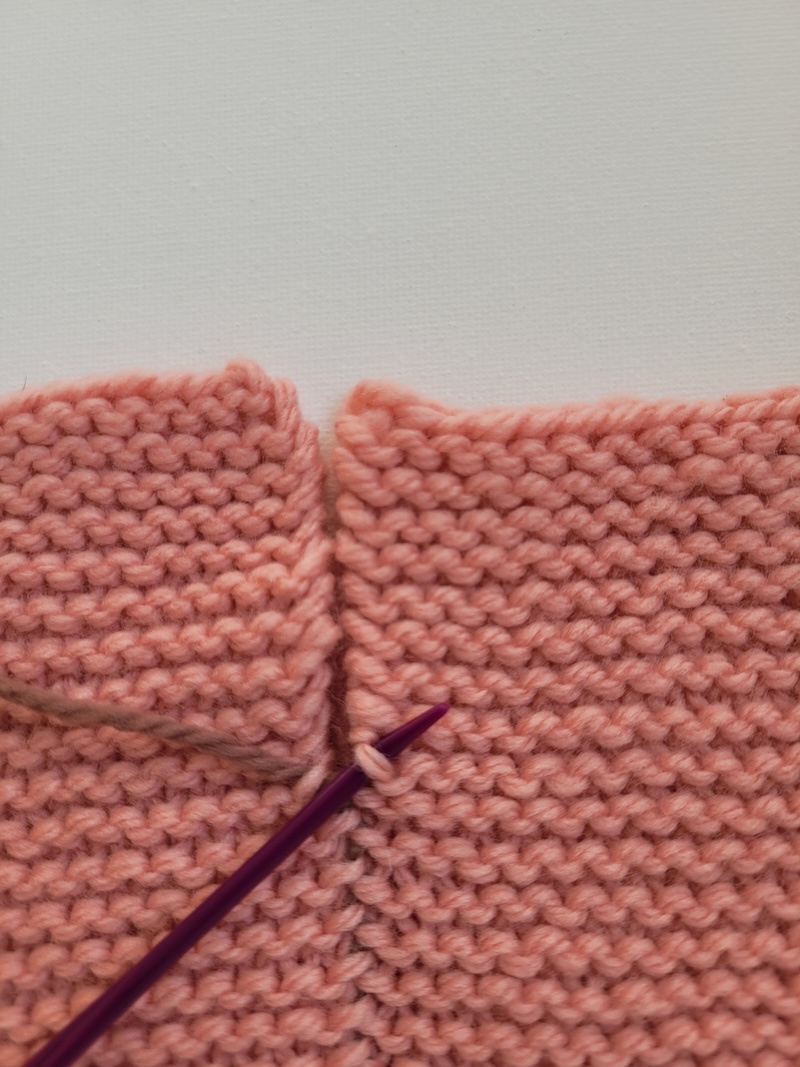
A flatter seam for blankets if you just work in the edge of the purl ridges of garter stitch.
Up next: two other directions!
Just about to seam a knitted vest for a child. Better do some blocking… thank you!!
Love Kate. She makes everything so clear and simple. Thank you !
This made so much sense,thankyou.
The simple statement “with right sides facing” has always confused me. I look at that LITERALLY. Facing me, or facing each other?
Looking forward to hints re knitting..esp sewing up
Yes, that “right side” thing. With knitting, the “right side” is the side the public sees when the garment is worn. Other use for the word “right” is accompanied by “front” or “back” and such. I hope that helped.
Hi Jan. In knitting, “right sides facing” means they are facing you.
Ever since I learned to knit, 65+ years ago, I have used bobby pins to hold the pieces together as I sew up the seams. They hold the edges together better than anything else I have ever tried, don’t slip out when the work is resting, and cost very little.
…..as though you knew I need guidance. Now! How do I join yarn in the middle of knitting? My last row was a purl row yet I had to continue knitting the next row on the purl side.
I’ve written about joining yarns here on MDK. I don’t know that I can include a link, but look for the article titled “Tie or Die”.
Kate
Very Helpful!! Thank you as always.
Great lessons, thank you!
Extremely helpful.
Even though I’m a seasoned knitter sometimes (actually more often than you would like) patterns leave you guessing!
Thank you Sylvia
Block first! Why didn’t i think of that?!
Thank you for the clear pictures with different color yarn. My sleeves never look great so started top down knitting instead… But this gives me courage to try again.
Such clear, clean and precise instructions.
The Good Kate as always!
How do you estimate the length of yarn uou need to sew the seam?
Hello! Good question… I tend to allow myself about one and a half times the length of the seam, in yarn.
Kate
You perfect angel! I’m just about to finish the last limb on a stuffy and had many questions. It seems you have read my mind. Thank you, thank you, Thank you!!!
I always learn a new tip from you, thanks. And my Irish grandmother called the blunt sewing up needles bodkins. I like it, but gave up trying to use it with others, as it just confused them.
Thank you so much for this! Just started knitting again after a twenty-five year gap (then son; now grandson): and this was the bit that petrified me. You have put a big friendly arm around my shoulder, and given me help – and confidence – exactly when I needed it. What a star!
I just finished putting together a knitted garter stitch baby blanket using the mattress stitch way which I was not happy with as cc it makes a right and wrong side with a visible bump of a seam. Your way is what I will use from now on. It is perfect and will finish my things much more professionally. BTW I turn 80 this December and have been knitting since I taught myself at age 22 while a nurse in the Army serving in Vietnam so though I am a lefties I knitting from looking at a book so right handed. I crochet left handed as at age 7 my grandmother taught me and i sat acriss from her so I have to mentally reverse patterns.
So nice I want to learn from you
This is a great article for beginnner
s as well as experienced knitters/
Thank you
Sometimes it is easier to use matching yarn with one ply pulled out of the yarn . Say 3 plies of 4 ply yarn. Keep your stitches loose. It might even look and feel wrong while doing it, but when the item flexes but not at the seams , it looks and feels bad . Check both sides as you go. And basting helps . If you baste with loose contrasting yarn, you can only see the seam . You are not holding the fabric you knitted correctly aligned and sewing, you are only sewing nearly what is already aligned .
When you say don’t pin the piece, do you mean not the edges or not at all. If not, are you just shaping it without pinning and using guage brilliantly to get the right size?
Blocking before sewing does make a lot of sense.
Correct, no pinning AT ALL! Indeed, if your gauge is good (you’ll have measured after washing the swatch), then the piece will magically turn out to be the right size.
Kate
That was very helpful thank you Kate. I used to learn all these things from my mother but since she passed away my sister and I muddle our way through on you tube .
Clear and logical explanations. Especially for ne, knitters. Thank you.
Kate you are right most books assume we know how to sew the garment up.
I have always had a thick seam finish, now I am looking forward to a more professional thiner seam.
Thank you for sharing your knowledge.
Meg.
Where have you been all my life?. I’m not kidding, at the age of 67 I didn’t think that I would ever have the skills to pick up my knitting needles again. it’s been years Since I was a knitter . While my knitting was good my seaming was horrible.
Then I found your Blog and your article about seaming and it’s brilliant, not to mention Simple.
Thank you so much
Look forward to reading
a lo of interesting and valuable information
Best thing I’ve read about my least favourite part of knitting. Thanks
Very helpful, thanks !
Very clear pictures and directions!
I love to knit but I hate to assemble the pieces. I’m sure they’ll be wonderful if I ever put them together. This is a great motivational piece. Kate makes it sound so easy and not threatening at all. I’m going to try it because I currently have 4 sweaters that I need to finish. ☺️ Thanks Kate.
Your instructions are so clear and the pictures just added more clarity. I’m definitely saving this for future projects.
Thank you Kate.
This is possibly the very best lesson I have had in the art of finishing a garment. I’ve been looking for help with this for ages. Thank you so very much. ❤️
Thank you so much Kate! Crystal clear as always. Jan, right sides facing means facing EACH OTHER such as when you are doing the three-needle bind off. As Kate says in her article when right sides should be facing you, the knitter, the term “right sides facing UP” is used. Such as when you are doing the mattress stitch for example as she describes here. And Gail, because you are a former Vietnam nurse, I wonder if Kristen Hannah’s book The Women would interest you, or would you rather not re-live that experience? I’m in the “80-in-2025” club, too, and well-remember those days.