Beginnerland
Skill Builder: Seaming (Part Two)
This is the second of two articles. In the first, I covered side seams on different fabrics.
Now we’re joining cast-on and/or bound-off edges.
As with the other methods, always wash your pieces before you sew up so that they settle. And work with the right sides of the fabric facing.
What unlocked this one for me was focusing on the shape of a knit stitch, and using that as a guide.
A knit stitch is a v. At the bottom of the v, the two strands of the yarn that form the stitch touch together.
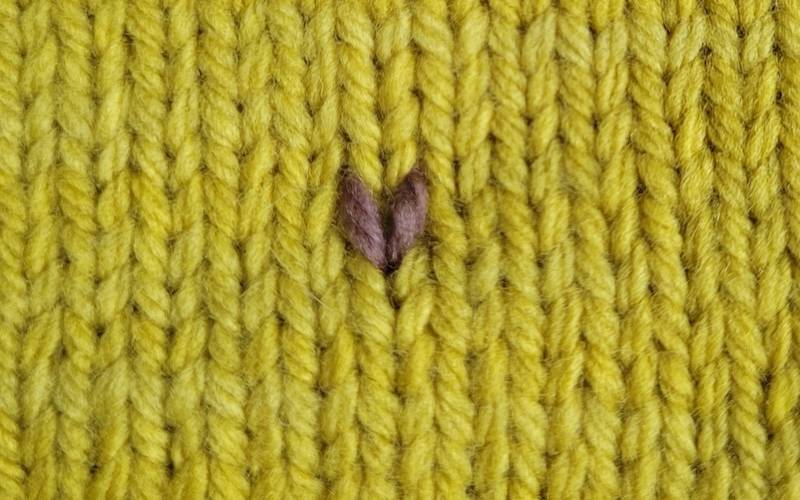
At the top of the v, the two strands of the yarn that form the stitch are separate; the bottom of the stitch in the row above sits between them.
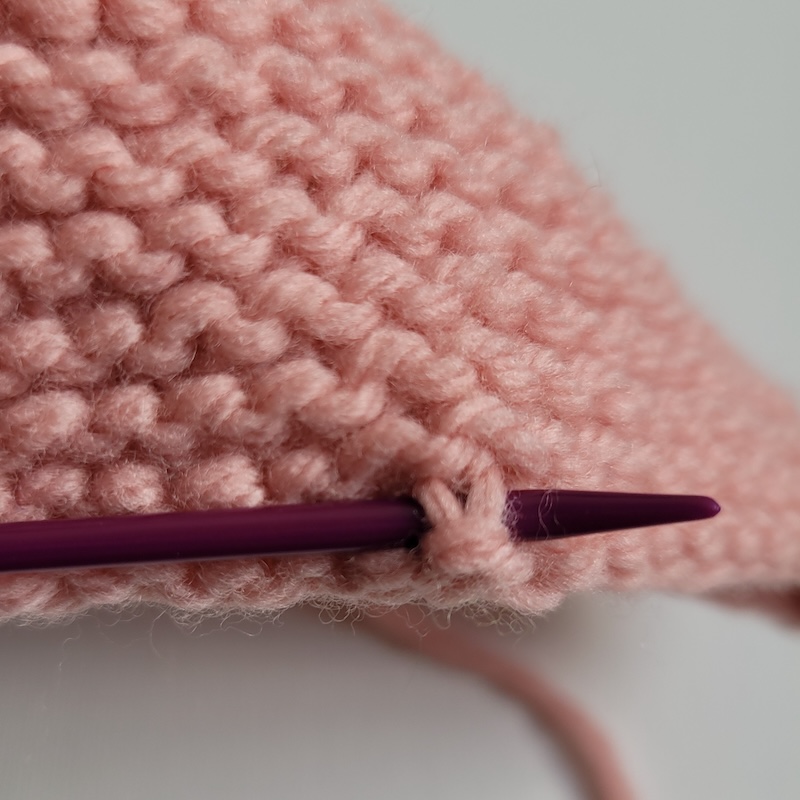
We’re going to use the pointy end of the v, the sharp end. No matter whether it’s a cast-on or bound-off edge, there are little sharp points pointing towards the edge.
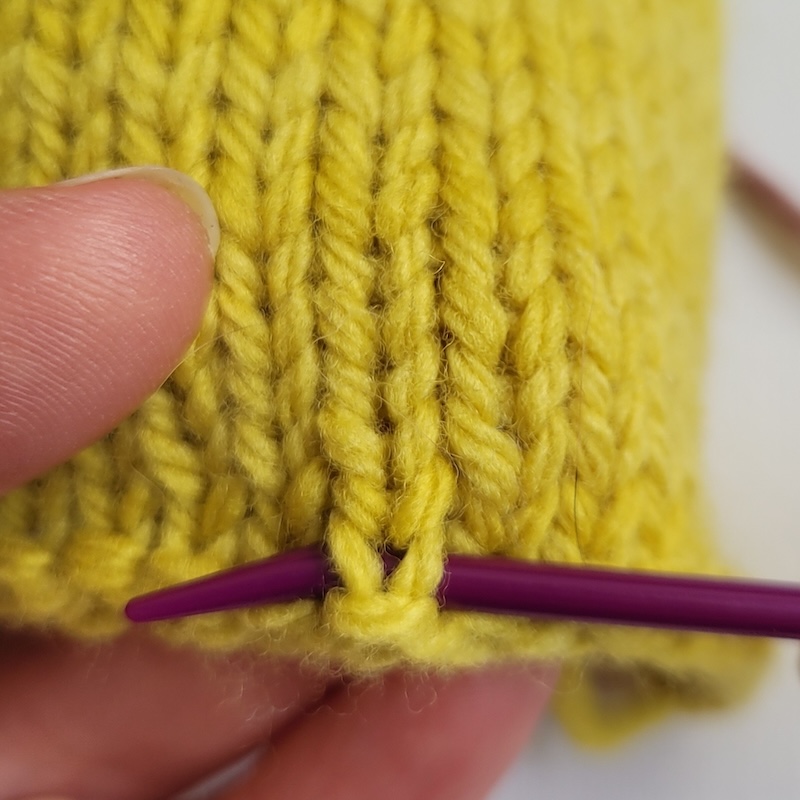
This is what the point looks like just above a long-tail cast on edge.
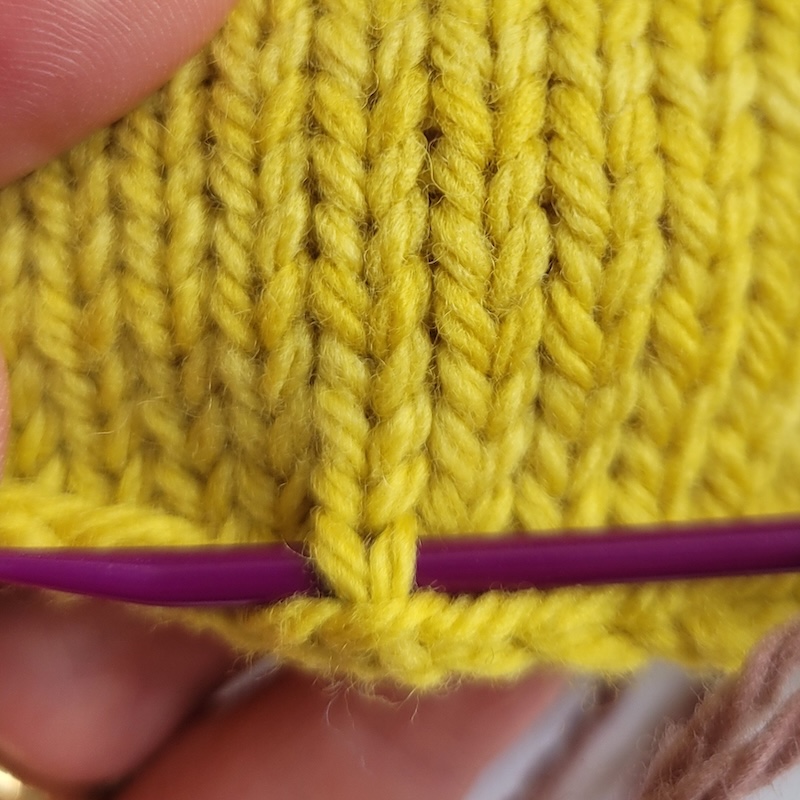
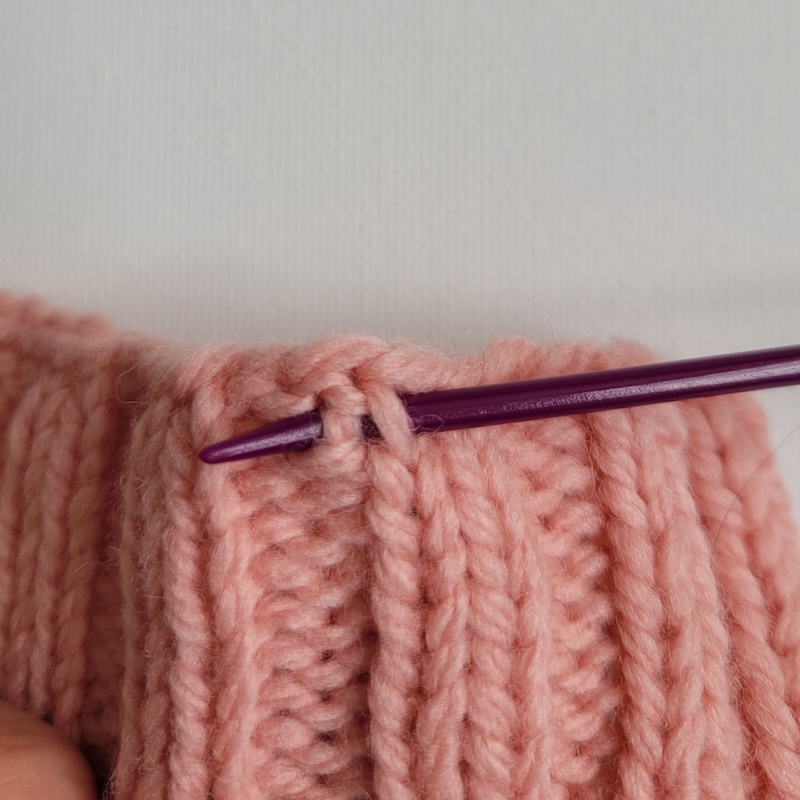
This is what the point looks like just below a standard bind-off edge. (Yes, I’m holding it upside down, but I find it’s easier to identify the vs that way.)
Think of it as shark’s teeth: What we’re looking for is the ‘sharp’ end that points towards the to-be-seamed edge of the fabric.
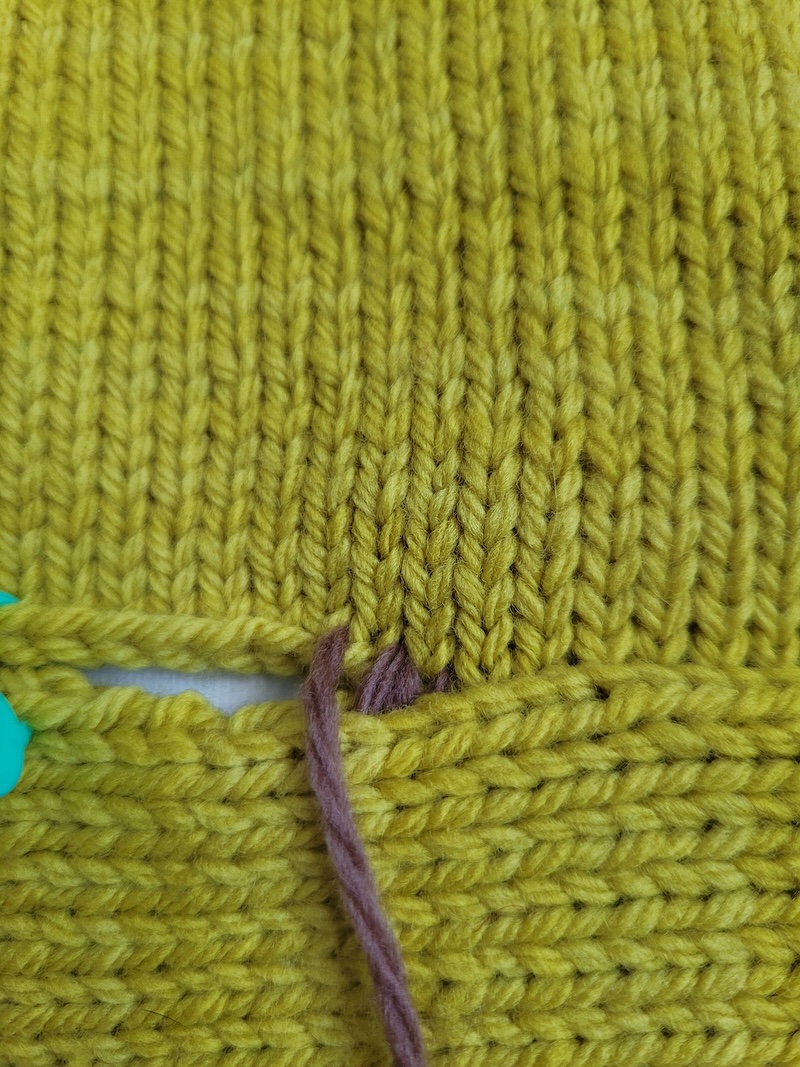
And that’s it. Thread your tail on your darning needle and work across, going under the sharp points of the vs. On the top fabric, they point down towards the seam; on the bottom fabric, they point up towards the seam. You’re always going under both strands of the v, alternating between top and bottom.
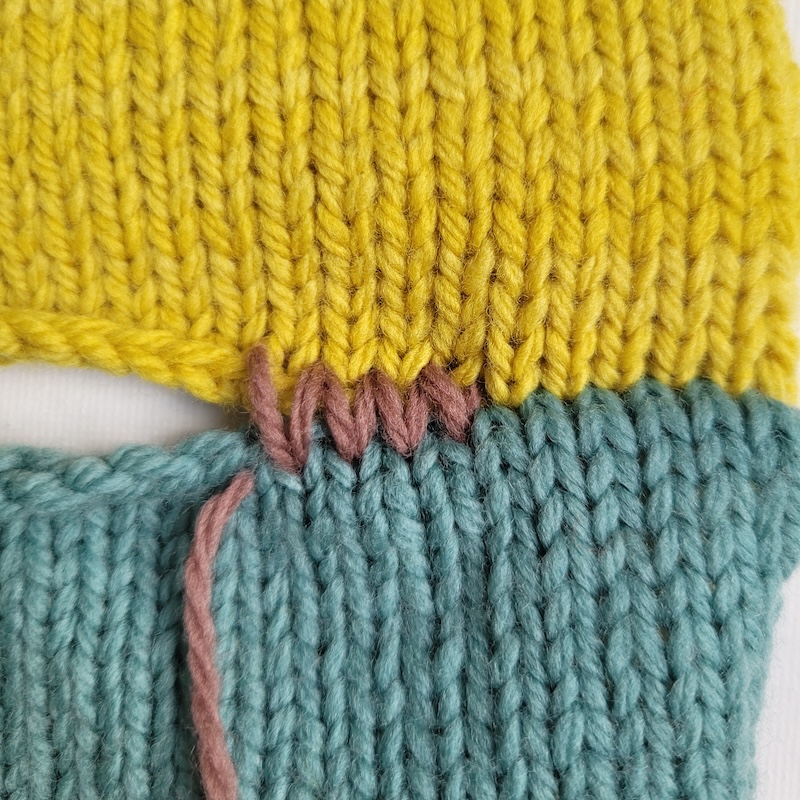
You can confirm you’re doing it correctly by looking at the path of the seaming yarn: you’re making a new stitch that bridges the two fabrics and it should slot into the columns of stitches invisibly. Because you’re working under stitches, this seam requires you to have the same number of stitches on both sides. The pattern will have sorted that out for you.
Pull it tight as you go, so that the seam “stitches” disappear and the join is firm and strong—you can see this on the right hand side of the above image.
The brilliant thing about this method is that it works for any fabric. Yes, really! Any fabric has those vs. How close they are to the edges and what they look like will depend a smidge on your cast-on and bind-off methods, but I promise they are always there.
Roll up the top and bottom edges of your garter stitch, you can see that the vs are there.
They are even hiding in the edges of your ribbing—but in this case I do have one tip: if you bind off in ribbing, the vs that sit between knits and purls can a little hard to find. If (and only if!) you’re going to seam along the top edge of a ribbed fabric, bind-off as all knits. It’s a million times easier to see the vs you need.
The v that sits at the top of a knit/purl transition is a little funky looking.
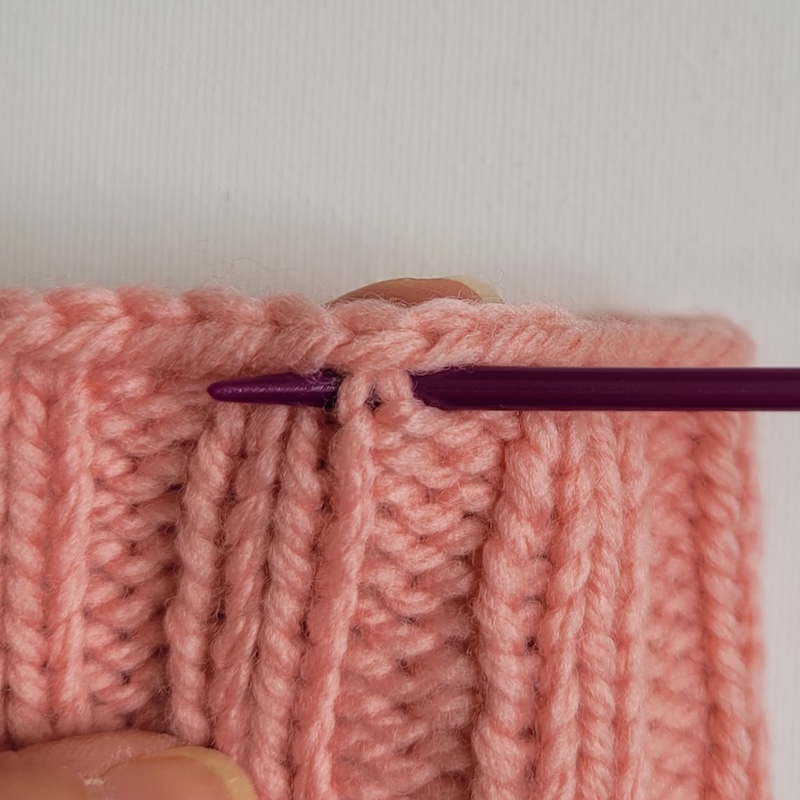
It’s so much more normal-looking if you knit all the stitches in your bind off row.
When the two fabrics are perpendicular to each other (the top edge of a drop-shoulder seam to the side edge of an armhole, for example, you have a mixed-direction seam.
If you have a side edge and top/bottom edge, use the side edge method on the side edge—that is, working under the bars—and the top/bottom edge method on the top/bottom edge—working under the sharp points.
The only thing to be careful about with this is that it’s not one-for-one. You’re joining stitches to rows, so you have to consider the stitch to row gauge ratio (OH NO SHE’S TALKING ABOUT GAUGE AGAIN…).
Knit stitches are wider than they are tall; that is, measuring an inch across gives you a smaller number of stitches than rows in a vertical inch. The ratio is usually a pleasing three stitches to four rows, give or take. For every three pointy vs, you need four rows. I do this: one stitch-one bar, one stitch-one bar, one stitch-two bars.
Clipping the fabrics together with removable stitch markers can help with this. And if your stitch-to-row gauge ratio is different because of a pattern stitch, then use the pattern to guide you.
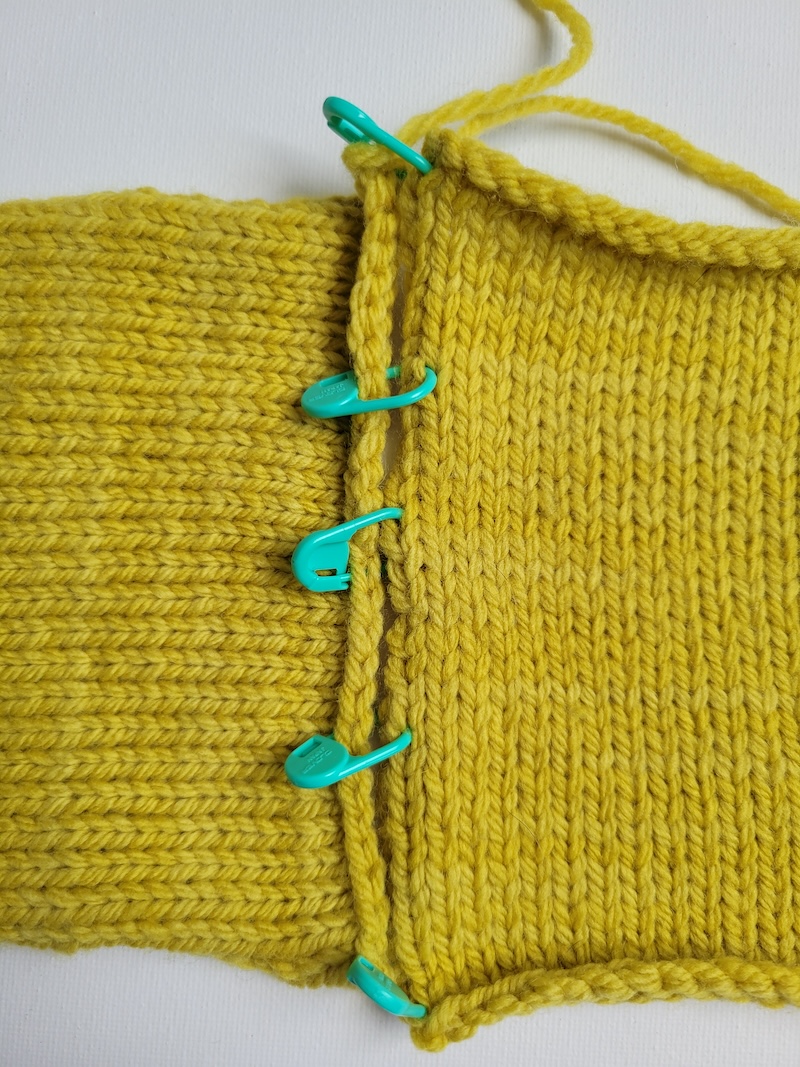
Set yourself some milestones to help you ease the two pieces together.
When you pull the seam tight, the join is absolutely invisible.
And that’s it! Really! Three seaming methods to join any knitted fabrics to each other.
Extra bonus tip: Setting in a set-in sleeve
The biggest seaming challenge in garment making is joining a shaped sleeve cap into a shaped armhole.
The trick is to clip the pieces together and work in two passes from the shoulder seam to the armhole base.
Work in sections. The center top will typically require the perpendicular method, the midsections will require the side-by-side method, and the bind-off steps at the base of the armhole will require the top-to-top method.
Once you’ve clipped them together, identify which methods are needed for which section, and go for it. You can do it!
Thank you Kate. Absolutely perfect tutorial. I’m going to bookmark this one so I can go back and refer to it for the next time. Any chance you are also a crochet seaming wizard?
This was perfect timing for me, I’m making Lisa Richardson’s top Radish. It’s knitted side to side, a first for me. I really appreciate this article and look forward to hemming it by following your instructions
I have a lingering sweater from a Field Guide that has been waiting for this post.
Now I just have to find the bag it is in.
Thank you, Kate.
Such clarity!
Thanks as always…. And SAVED!
Brilliant! Bookmarking also. Thank you!
So often it is the seaming, not the knitting that stops me in my tracks. Thanks for this one, Kate!
Excellent article and pictures. Thanks Kate. And for anyone who has not been fortunate to take a class with Kate….her classes are great, full of useful information, common sense and humour.
Bless Kate for making things simple and clear!
Your approach is always helpful Kate. Thank you for digging way down identify those Vs in different knitting aspects. And prompting us to consider gauge in perpendicular pieces: 22 to 28 comes to mind!
I really struggled with seaming Ito Kinu (yes, the Shakerag) and cast off sloped shoulder edges where I had slipped the end stitch to avoid a dozen ugly steps. My slipped stitch lengthened and I was still dealing with moving the tapestry needle across two rows. It took many repeats to get a satisfactory appearance in this thin, not stretchy yarn, about half in two strands!
Thank you, Kate. I have waited for years for tutorials this clear and well written. Thank you to MDK for sharing this.
What a great article! It all comes clear to me now!!! I avoid sweater patterns that call for seaming together at the end, but now that I’ve (like so many others above) bookmarked your words of wisdom, I feel much more confident. Thank you so very much!
Very illuminating thanks
Really appreciate your photos of the process Thoroughly helpful, Thanks to you and MDK
I really appreciate Beginnerland. I’ve only been knitting a couple of years and am always looking for extra guidance. This article was perfect.
Thank you so much for this article! I used Part 1 for seaming Paulina – a side-to-side sweater. I follow you on bluesky and saw your post on your upcoming book, “Math for Knitters”. Already pre-ordered my copy from Nine Ten Publications. You always make me feel that I can do anything.
Perfect timing! I just seamed a headband end to end, but not correctly. I’ve ripped it out (it’s only 20 sts.) and will now be redone to look picture perfect;)
Super Helpful. Thank you
Wow- that was great! Ready to try it out. Miles de gracias!
Thank you, Kate. This article is the best guide to seaming I have ever read.
Saw you at the Fearless Knitters Summit, Enjoyed your sessions there, too.
Please keep the tips and tricks coming.
Nancy D
These two lessons on seaming are the best descriptions of the process I have found. Thank you so much.
I have attempted many different ways to seam and yet nowhere has any one explained it so clearly and offered such simplicity as you have in this 3 part column. I thank you. I have learned so much and feel less intimidated to try seaming projects again. Now I need to make sure I don’t lose your articles.