Beginnerland
Skill Builder: Mistakes (Part 3)
This is the last in a three-part series about fixing mistakes and undoing your knitting.
Here is part one. And part two.
Now it’s time to tackle The Big One: Frogging.
(Why “frogging”? Because you take the knitting off your needles and “rip it.” If you say that out loud, it sounds like “ribbit.”)
Need to undo a whole bunch of rows? There’s no way around it: you need to take the needle out of the stitches and yank on the yarn to unravel. But there are things you can do to make it a bit less stressful.
When putting the stitches back on the needle, use a smaller size needle to make it easier to grab them—several sizes smaller! And don’t worry too much about being precise: if a rescued stitch is split a bit, or it’s the wrong way around, that’s fine. Just get a loop back on the needle! You can fix any incorrectly seated or split stitches once they are safe.
After frogging, I always expect to unknit another row or two, as mentioned in my last column, stitch by stitch, so that I can confirm I have the right number of stitches, as well as make sure everything is seated correctly on the needle and nothing’s got muddled up. If working a pattern stitch, unknitting a row also provides an opportunity to step through the stitches so you can “read” the row, and confirm where you are in the pattern.
Put a Lifeline In
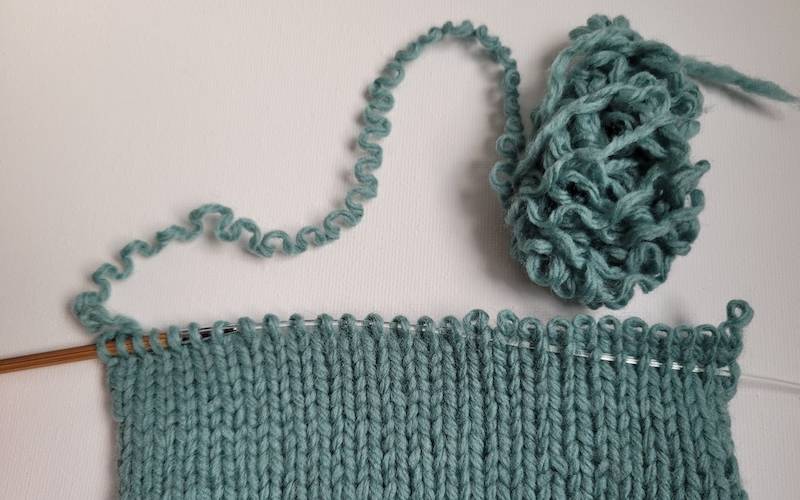
A lifeline is a wonderful thing. This is a length of a smooth, finer weight, contrast color yarn that you feed through the stitches on your needle, placed before you work a particularly tricky part of your project.
That way, if something goes wrong you can undo without stress: the stitches will be caught on that yarn, and won’t unravel any further than that point.
The lifeline is ready for me when I inevitably get too distracted by my favorite tv show and mess up my ribbing.
A lifeline is only helpful, of course, if you’ve already put one in your work.
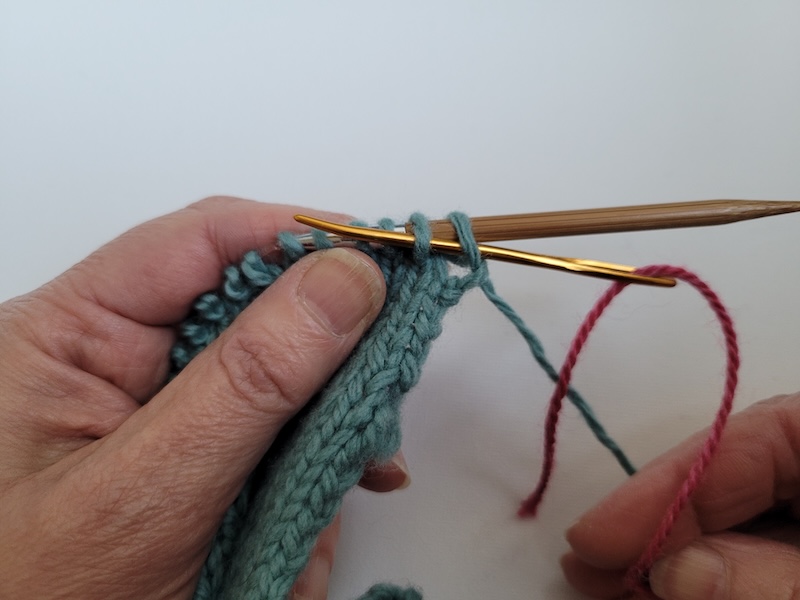
You can, however, do a sort of Afterthought Lifeline. Grab a needle several sizes smaller than the one you’re knitting with, and feed it through your knitting, just about where you want to undo to. Grab every other strand, one leg of each stitch, all the way across, counting off the stitches as you go.
This is an inexact science: Don’t worry too much about the wonky edge stitches, it doesn’t really matter if you’re getting the right or left leg of the stitches, and it’s not a problem if you seem to have one too many or too few stitches. Do the best you can.
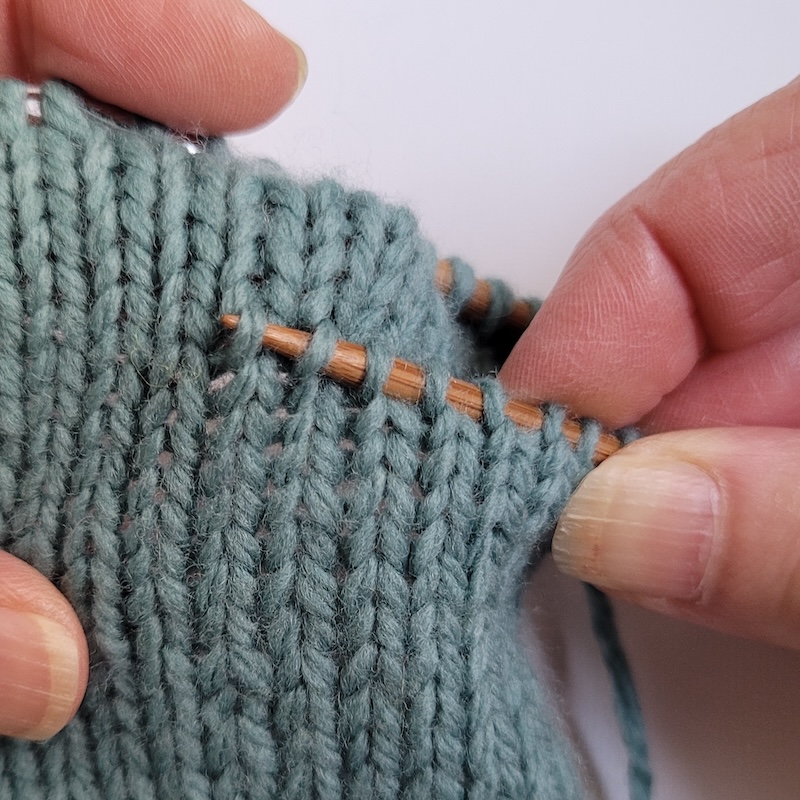
Feeding the needle through, catching every other strand, as best as I can.
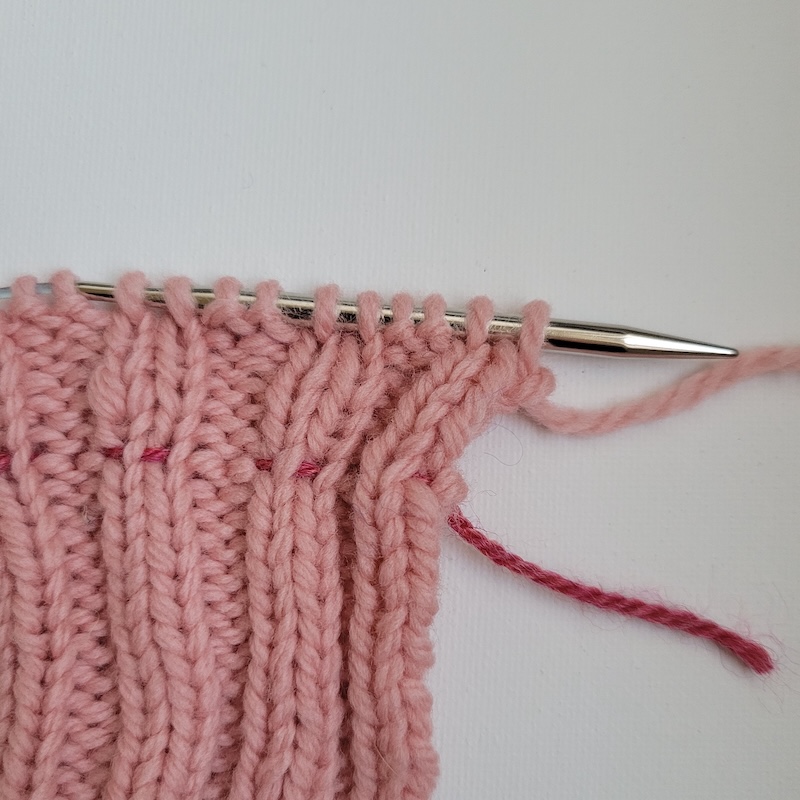
Then take the knitting off the needles, and tug on the yarn to unravel to that needle. Again, this is never a perfect thing: you’ll likely end up with twisted stitches; you might have missed a stitch; heck, you might find that you’ve changed rows partway through, so you end up with some stitches undone more than others.
You can see it in the image below: I goofed, and the needle is two rows lower on the right-hand side than the left.
Yup, I messed up a bit. But I figured it would be more helpful for you to see this than if I had done it perfectly!
But it’s ok: this is not the final step of this fix! Once you’ve got the stitches saved, go back and unknit a row, stitch by stitch, making sure to correct what you need to correct. Then start fresh.
Oh, and don’t forget to start breathing again!
the afterthought lifeline can also be with the needle that is several sizes smaller – I like to use a zero! it’s also easier to put back on to your gauge size needle then.
Great tip, thanks!
This is really encouraging – I have done this before, both well and poorly. Always helpful! I am currently tinking the toe of a pair of socks, which have been worn, and the felting makes it much more challenging. However, I will persevere. A simole darn won’t do.
“simple darn”. Must proofread before sending.
Wow! Never heard of the afterthought needle trick but that’s brilliant! I only started using lifelines in the most recent years of my knitting…not sure if I’ve ever even had to actually use one but it sure makes me feel better to knkw it’s there:)
And thanks for the explanation of “frogging ”
…now it makes sense 🙂
Loved how forgiving you made this, what a gift to those of us freaked out about frogging our work!
Right?
From this website i learned about Tulip interchangeables. The Tulip cord (which works with my cheaper interchangeable needle tips) doesn’t need the fiddly wire key to change needle tips. You would not believe how much easier this makes after-the-fact lifelines. Pop on that skinny needle, slurp up the row, but remember to change back or you’ll be frogging again when you see your new oddly small stitches.
I’m a bad combination of distractible and perfectionist so I am ALWAYS frogging (as my knitting group can attest).
I always feel safer/less anxious about frogging if I put the work to be frogged on a table, rather than in my lap. Seems less likely to take a leap and cause me to lose track of what I’m doing or rip more than intended.
Also, I have learned to insert a lifeline right after I’ve knit a tricky bit correctly, as in, anything I wouldn’t want to reknit. Especially helpful when knitting lace.
Great suggestions. Thank you.
If you are using interchangeable needles, here’s the best ever solution for putting in a life line. Use “button thread” which is stiff, cut plenty long (twice the length of a shorter row, a generous extra on a longer row). Thread it through the hole that is used for the pin when changing needles. Knit along and the thread will create your lifeline. I also use it to mark every tenth row, for example, so I don’t have to recount as often if I’m not sure I’ve clicked my stitch counter!
I love the button thread but if you can’t find any I’ve gotten used to reaching for dental floss. Always around and slips through so easily and unless you are using a white yarn easy to see and count rows or stitches.
Just try to avoid mint-flavored floss ;>
Brilliant! I’m going to give this a try on my next Stephen West shawl.
That is truly genius level!
Love your “shared wisdom”. Thank you.
Wonderful tip! Will use in future
I prefer TINK to frogging for knitting. It is technique-specific. Frogging is definitely better suited to embroidery.
Both TINK and frog are used in knitting. TINK is obviously KNIT backwards, and that’s what one does when carefully undoing the last couple of rows you haven’t frogged. As Kate said (though she didn’t use the term TINK) this allows you to count and reseat your stitches, etc.
Frogging is exactly as Kate explained–because you’re “ripping, ripping, ripping” more than one row, saying that aloud sounds like “ribbit” which in English is the sound a frog makes.
Without an explanation I thought frogging was so called because the loose stitches look like a lot of little froggy eyes! Thankyou for all your advice, and ‘been there’ experience!
These tips are very helpful. I knitted a lace shawl in linen. Lots of mistakes. A lifeline would have made all the difference in the world. Thank you so much!
I just finished using these techniques (well, not the done-in-advance lifeline, unfortunately) to shorten a sweater I made for my husband. One suggestion I would add is that it is helpful to wait a day or so (or at least overnight) before ripping. First, it gives you time to think through what you’re going to do, and whether FROGging is the right thing. And the stitches will set a bit so they are less likely to unravel beyond what you’d like.
Best advice! Don’t start ripping late at night.
Thank you so much for this. I love Kate’s books and her teaching.
And lifelines are easy to put in if you have interchangeable needles with lifeline holes!
I always wondered what the extra holes were for. Now it makes sense.
Aoa, I am impressed. You are Master of knitting because you solved a tangled issue very easily and simply.
Simple but very effective tips .
I feel enabled to try more complex patterns now.
Thank you
I recently did this to a sweater that I knit with much too much length. It needed to be shortened and I wanted to graft the ribbing back on instead of reknitting it.
2 needles threaded in (imperfectly, but good enough… then fixed)
Almost 100 grams of yarn ripped out and then two pieces of sweater carefully kitchenered back together seamlessly
Next I have to shorten the sleeves. More ripping!!
I love this..thank you..
I am glad it’s not just me that can’t track the same row all the way across!
I heard about lifelines but didn’t know how to put them in . Thank you for your help.
Brilliant! Love the “afterthought ” lifeline!!
Having trouble with neckline. 68 st. Dec 1 st at neck edge of next 6 rows on foll 4 alt rows then on. 4 foll 4th rows and at same time cast 2 sts at beg of 2nd row and following 6 alt rows please help