Techniques
Get Your Seam On: Part Two
One of the purported advantages of working garments seamlessly is the ability to try them on as you go. You can check various aspects of the fit: overall size, the upper body/yoke depth, sleeve and lower body lengths. And it’s useful, too, to help you visualize how the thing will look on your body.
A major hesitation knitters have about working garments in pieces is the belief that there’s no way to try them on as you go. You might be surprised—there’s actually a lot you can do to confirm garment shape and fit, even when working in pieces.
1. Confirm that it’s going to come out the right size
You’ve heard the swatching lecture, but you’ve also heard people say that swatches lie. Your gauge can shift between the swatch and the project, for a few reasons: if you’re using different needles (different materials, tip lengths, etc.) and those can affect the size of your stitches.
A sweater piece is larger and heavier than a swatch; you may be holding it differently.
You might just have got more comfortable with the yarn and the pattern stitch, which can shift how you’re knitting.
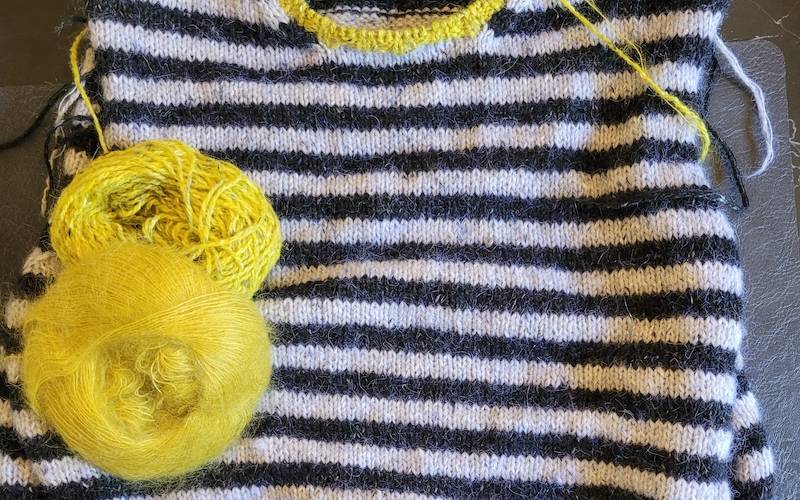
When working your first piece—usually the back—after you’ve completed any ribbing or edgings and at least three or four inches of the main pattern stitch, slip the stitches to scrap yarn (or a barber cord), and give the piece a handwash. (Nope, you don’t need to cut the yarns!)
Just soak it in lukewarm water for about 15 minutes, roll it in a towel to get most of the moisture out, and lay it flat to dry. Once dry, measure to confirm your gauge. Knowing that you’re on track means that you can relax and know it will come out to be the size you’ve chosen.
If you find that something has shifted…well, it’s better to know earlier, when there’s less to rework.
2. Confirm key measurements
This is about making use of the information in the schematic to help you visualize how the garment will sit on your body.
For the upper body, check the armhole depth/upper body length in the schematic. That measurement is always taken from the outside edge of the shoulder, straight down. Find the relevant measurement for your size, and hold the tape measure against your body.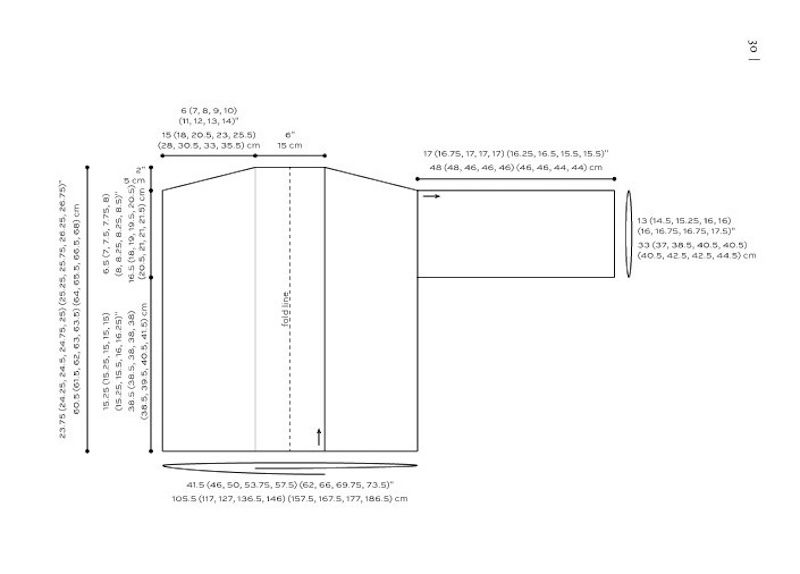
(Note: if the garment will be worn oversized, the armhole doesn’t actually sit at the tip of your shoulder, but a distance down your arm. For the most accurate measurement, look at the full-cross shoulder measurement to determine where the armhole actually sits.)
Once you’ve determined where the base of the armhole sits on your body, you can also check two more measurements: the lengths of the lower body and the sleeve.
In both cases, you must always start from the place where the garment armhole ends. This isn’t about your actual underarm! (The garment schematic may show that the lower body length measurement separately, or it might only show the length from shoulder—but either way, that’s how you can see where the hem hits.)
For the sleeve, you want to look at the length from underarm to cuff and exclude any cap shaping. That again starts where the garment armhole ends, not necessarily right up in your own underarm.
To get this right, hold your arm to your side, and measure first the garment’s armhole depth along the inside of your arm; then you can look at the sleeve length.
You don’t need to try the actual garment on because you know you’re knitting to gauge, and you can be confident that the piece will absolutely come out the size the schematic indicates.
3. Try it on
That having been said, it’s not just about knowing the numbers, trying the garment on is also about being able to really see how it works on your body.
Once each piece of the garment is complete, give it a wash; don’t wait until the end.
It sounds simple, but it’s incredibly helpful to just place the garment pieces on something you already wear: it’s so hard to know if the back of a sweater is the right width without further comparison. The context you need is right there, in your wardrobe! Get the knitting out of your project bag and out into the real world.
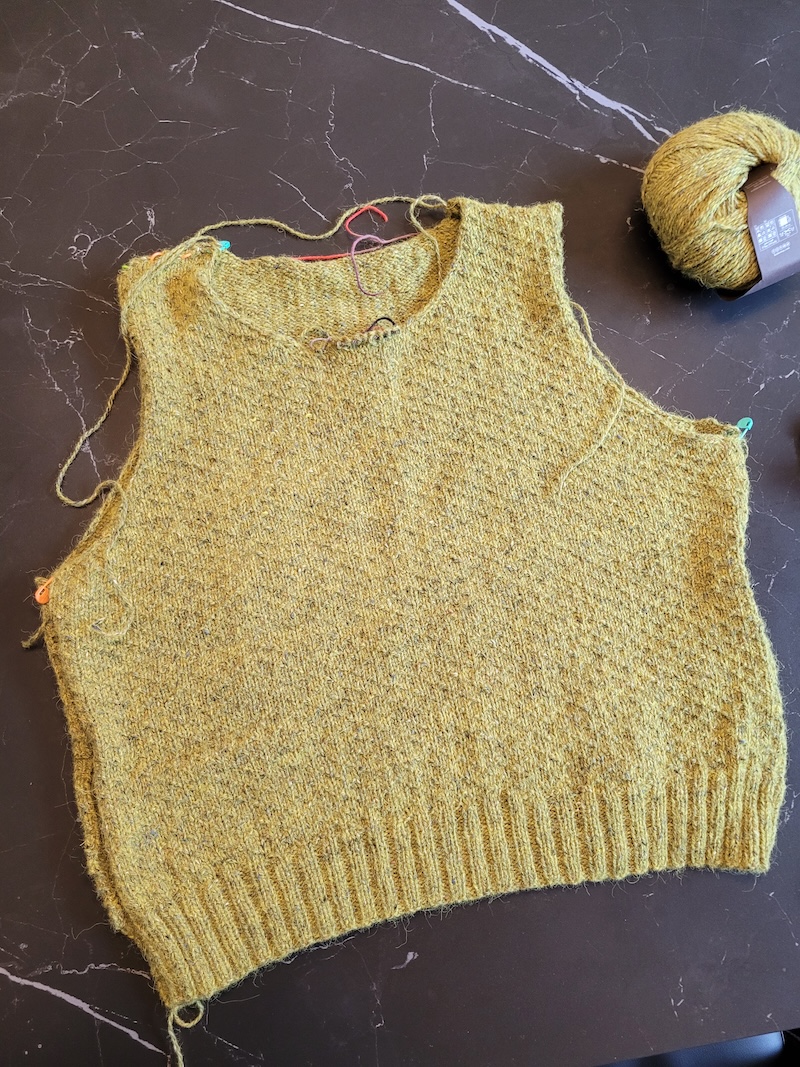
Partially assembled. I can try it on to assess body fit and determine required sleeve length, before I cast them on.
You can use safety pins to try any individual piece on: just pin it to what you’re wearing. To check the back, for example, put on a fairly close-fitting t-shirt or top, and pin the shoulders of the sweater piece and your top together.
When the back and the front are both done, use safety pins or removeable stitch markers to join the shoulders and sides, so you can wear it like a vest.
At this point, if I’m happy with what I’ve got, I’ll seam the shoulders and work the neckline, as it breaks up the finishing task a bit.
Plus it gives you a way to confirm sleeve length, as you can pin the first finished sleeve in, to check that, too.
No matter which way you’re making it, how a garment fits should never be a surprise. Don’t wait until it’s complete to assess the situation!
For part one of Kate’s Seaming Series, click here.
Love this Kate. Thank you!
More excellent advice; thank you Kate and MDK! I actually prefer seamed sweater patterns for the flexibility in sizing various pieces, and for the structure. But I don’t mind sewing up seams – usually!
Pin the back to a tee to try it on!
Great idea, thank you!
Also, I must reinforce the concept of sewing as you go- it does make the final finishing less onerous.
Brilliant!!!
Kate
Thank you for reinforcing the positives of seamed garments. I love the idea of actually comparing to our current wardrobe and making the trying on an option.
While top down sweaters have the benefit of being seamless, I also find them heavy. I’m wondering if that’s why we’re seeing more and more classes on injury prevention….just a thought….
A friend and I keep saying the next big trend is going to be seamed sweaters! Great tips for checking fit!
Great tips — especially the idea of pinning to a T-shirt for try-on!
May I add one more? Listen to that tiny voice inside your head! Unless you’re a newbie knitter, or the sweater boasts a “unique construction style!”, you’ll have a pretty good idea of how big that piece should be when you smooth it out to admire it. And if that teeny voice keeps saying “that looks awfully big” (or small), please use one of Kate’s Magic Measure Methods immediately (or again).
Stuff Happens during the process. Gauge change, memory lapse about which sizing numbers to use, forgetting to change needle size, overlooking a step in the shaping — all can derail the process. But that itty voice in your brain knows “somethin ain’t right here.”
Listen to it!
Lynda, having just reknit parts of a recent sweater several times, I’m here to second this — Even if you’re sure you calculated correctly, if it looks like it might be too long, it probably is. Stop and check.
I think I often just don’t WANT things to be off, though it’s always easier to decide (and fix) this earlier rather than later.
Kate! Super helpful! Will you marry me?
Kate’s advice is always spot on! My personal adjustment is that once I started knitting sweaters which were seamed, instead of a separate gauge swatch, I started knitting the sleeves. Both at once! Wonderful gauge swatches, pattern trial, etc. If after a few inches and a soak everything works, great! Off to the races. And no “sleeve island”. The shaping happens to both sleeves, so there’s no trying to remember what happened on the first sleeve.
I have tried knitting a few top down (including the Waffle sweater), but I do prefer sweaters in pieces for all the reasons covered in Kate’s columns. Knit on!!
I love the idea of blocking the first piece when you’re just a few inches into the pattern. Imagine all the frogging I could’ve saved myself when my swatch lied to me if I had done that! Thank you so much for the tips.