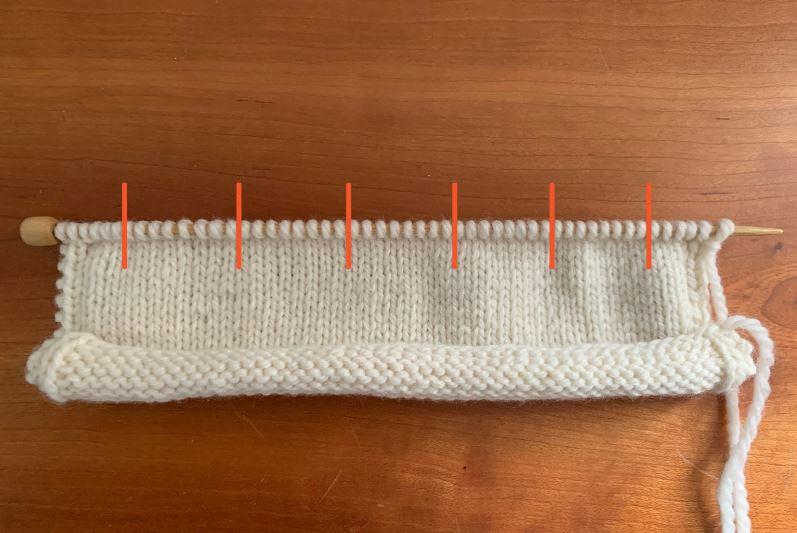
How To
Techniques in Depth: Less Evenly Across?
Last month I wrote about how to tackle pesky “evenly across” instructions. As promised here’s the follow-up for those times when the numbers aren’t so tidy.
Increasing
For example: “Increase 6 stitches evenly across the 52 stitches of next row.”
52 ÷ 6 = 8.666667
You’ve got 6 groups of 8 stitches each and a few left over since 52 = 6 x 8 + a remainder of 4. Here’s how to configure the increases:
IN THE ROUND
Those numbers give you the following: (K8, m1) 6 times, k4.
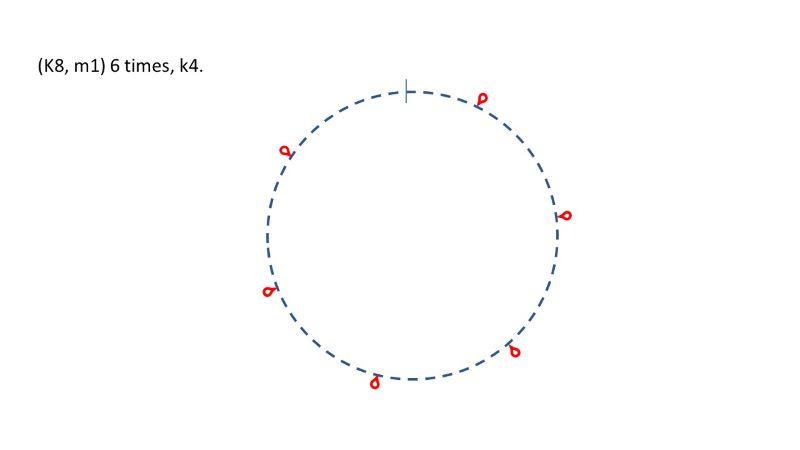
That’s not very even, since you end up with 12 stitches between the first increase worked and the last one, split across the start of the round.
In situations like this, I like to write out the full round, to visualize what’s happening:
(K8, m1), (k8, m1), (k8, m1), (k8, m1), (k8, m1), (k8, m1), k4.
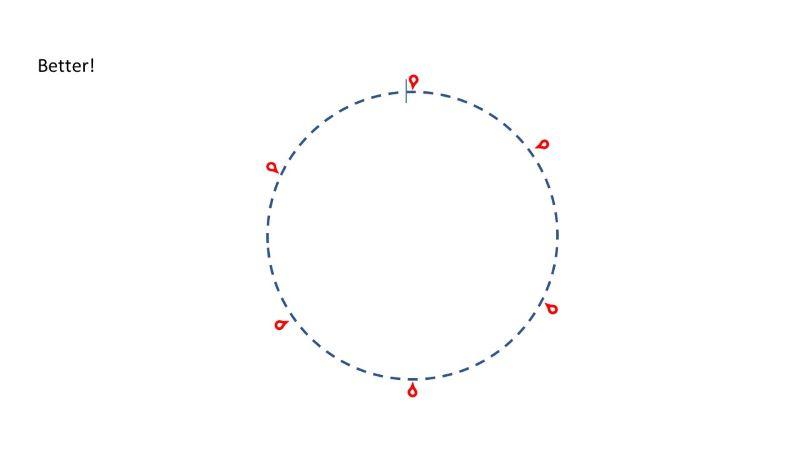
A good solution is to just pepper those extra 4 stitches along the round, changing four of the k8 to k9.

(K9, m1), (k9, m1), (k8, m1), (k9, m1), (k9, m1), (k8, m1).
IN ROWS
If I’m working flat, in rows, it’s a little different. In the previous column, I said to put the increase in the middle of each repeat, for tidiness.
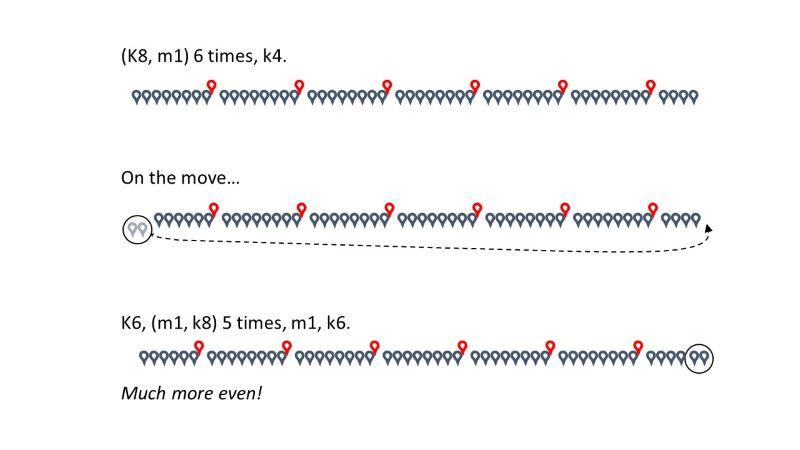
(K4, m1, k4), (k4, m1, k4), (k4, m1, k4), (k4, m1, k4), (k4, m1, k4), (k4, m1, k4), k4.
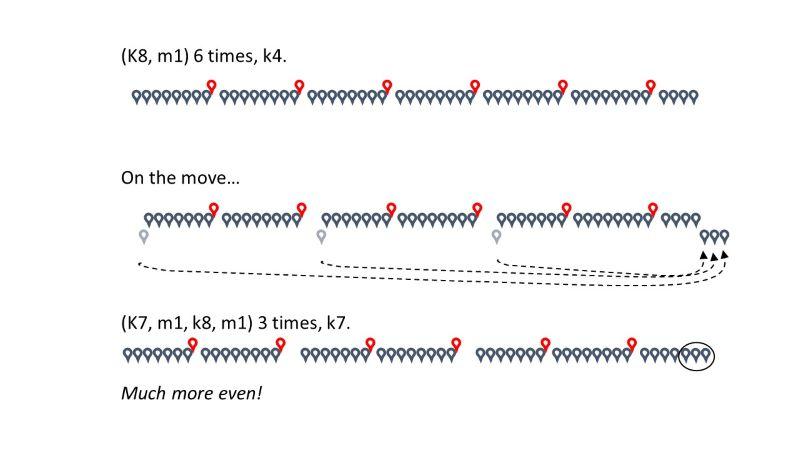
But this isn’t great when there’s a remainder number of stitches because, as in this specific case, it puts 4 stitches at the start and 8 at the end. Lopsided! (See the top line in the illustration below.)
To distribute remainders more evenly, you can just split them between the start and end of the row. (See those stitches on the move in the middle line of the illustration below.)
In other words having a remainder gives you a different way to handle it … put the increase at the end of the repeat (like you do for working in the round), and the remainder at the end of the row (as illustrated in the bottom line of the illustration below):
(K6, m1), (k8, m1), (k8, m1), (k8, m1), (k8, m1), (k8, m1), k6.
There’s another possibility: You could take stitches from some of the repeats and stick them at the end. If I steal a stitch from 3 of the repeats, and add them to the end, the spacing alternates between 7 and 8 all the way along the row:
(K7, m1), (k8, m1), (k7, m1), (k8, m1), (k7, m1), (k8, m1), k7.
They’re different, yes, but both solutions work toward more evenly spacing the increases. Remember, because the pattern wasn’t specific, you can do it however you want, however it makes sense to you!
Decreasing
The same tricks work when decreasing, of course. Just remember that the decrease uses up 2 of the stitches in each group.
WHAT IF IT’S A GIANT REMAINDER?
What happens if there are lots of stitches or lots of repeats to fuss with? You really get to dig into the math with this one.
Look at this one, taken from a real pattern I once knit:
Increase 41 stitches evenly distributed through 197 of the next row.
197 ÷ 41 = 4.804878.
Which is to say, 197 = 41 x 4 + a remainder of 33 stitches.
Which gives us
(K4, m1) 41 times, k33.
Because there are many more stitches in the remainder than in the individual repeats, distribute the remainders throughout the row. (Splitting the 33 between the start and end of the row wouldn’t really improve things.)
If I want to keep 4 at the start and the end, I’d subtract 29 from the end of the row, and pepper those stitches through the row:
(K4, m1) 12 times, (k5, m1) 29 times, k4.
Much better!
If you enjoy number puzzles, you could start to play with it a bit more, distributing the twelve (k4, m1) repeats within the twenty-nine repeats of (k5, m1)
How about this?
[(K4, m1), (k5, m1) twice] 12 times, (k5, m1) 5 times, k4.
Or even this?
(K5, m1) 3 times, [(K4, m1), (k5, m1) twice] 12 times, (k5, m1) 2 times, k4.
I love these sorts of instructions because there’s so many ways to come up with an answer. And they’re all right, they all work.
Writing it out might seem like a bit of a pain, but I find it very worthwhile: it helps me count up and make sure that I’m working the right number of increases and decreases, and it helps me keep track as I work the instruction. (Also, I’ve got good notes if I need to repeat the step on the second sleeve …)
Great post! However, I just use an online calculator, that does the math for me…
Fantastic article, the Knit Evenly app has been a god send for me, especially when I’m in the groove of knitting and don’t have the headspace to manually calculate http://www.jakrosoft.com/knit-evenly.html#:~:text=Knit%20Evenly%20calculator%20is%20the,Evenly%20delivers%20consistently%20great%20results.
There’s a free online calculator that does just that. https://www.worldknits.com/knitting-calculators
thanks Robyn for the info on free online calculator. Perfect!
Thanks Kate. I think there are two typos on the “in the round” suggestion. Aren’t we peppering 4 stitches not 5? And wouldn’t that eliminate the k4 at the end of the round?
Right you are! Fixed that typo. Thanks, Gretchen.
Wow, I’m just so impressed with your very cool illustrations! Thanks for this, Kate.
I do the math like this but then I put removable stitch markers across the needle to mark where the increases/decreases happen so that I’m not forever trying to remember what I’m supposed to be doing. Not a huge issue when the math results in simpler instructions, but for those compound instructions where you’re alternating intervals, it really makes it easier for me.
Excellent article, but please double check. Unless I am very mistaken, the combination of
(K9, m1), (k9, m1), (k8, m1), (k9, m1), (k9, m1), (k8, m1), k4. results in 62 stitches, versus the 58 desired.
am I missing something or is a bit of proofing precision needed?
You’re right! Deleted that extra k4. Thanks, Adele!
Okay I am excited to have a place to ask this question, which extends the topic somewhat: What about a top-down sweater, when you have more flesh in front than in back, but the pattern recommends regular increases? Logically, more increases should be in front right? Is it okay to just put 3/5 in front and 2/5 in back, or whatever suits you?
Erika… an interesting idea! I’m not a knitter or designer of raglans myself, for precisely this reason. They don’t fit my narrow-shouldered-but-busty frame. To answer the first half of the question: you could absolutely make the math work, yes! As to how to make it work for the garment fit, you’d need to consider whether you needed the extra fabric at the front for the entire yoke, or just part of it… It’s all about where the larger fabric is needed, if that makes sense? If I may express a (potentially unpopular :-)) opinion here: the seamless top-down isn’t the be-all and end-all of garment structures, and sometimes it’s easier to start with a structure that’s more amenable to these types of changes, and more easily adjustable… I’d recommend trying a garment worked in pieces, so you can more easily modify the area you need without affecting the others. And you might find a set-in-sleeve a bit more accommodating for your shape. Amy Herzog’s Ultimate Sweater Book is a super reference!
Yep. As mostly a sewer not a knitter I am very familiar with what my shape looks like in sweaters made in pieces/set-in sleeves. But I like both raglans and yokes. To accommodate the narrow top of armscye and then the much broader mid/bottom of armscye/bust, I think you would maybe do evenly-spaced increases for the first maybe third of the armscye (same in front in back as both are narrowish) and then stop increasing in the back and do all in front until you get through the bust.
Of course that’s FINE if you are not doing a pattern. In a pattern … well, I see a market niche! Yoke patterns designed to accommodate busts. Maybe there are some already out there?
Great article with lots of analysis And great diagrams. Thank you.
Great tutorial! Well explained & illustrated. Thank you!
Re increases evenly over row. . Instead of writing it out, I place pin on markers, splitting the numbers of sts by half each time. So midway row first, then middle of each segment. Repeat until I have the number of increases (markers) needed. That way I see the result and also can move the markers if the result doesn’t please me.