Beginnerland
Skill Builder: Mistakes (Part 2)
Last column, I talked about identifying mistakes, and various ways to fix them “in place,” either by dropping a stitch down or with some sneaky covering-up.
But some things just can’t be fixed—like, oh, you should have changed colors, or you started the lace pattern on the wrong side, or you forgot to work the sleeve increases.
Or there are cases when you could drop stitches down, but it would be too risky, complicated, and/or time-consuming. You can absolutely ladder down and rework large sections of fabric: whole cables, for example, or a section of lace patterning, but can take almost as long as just reknitting, be more difficult work, and not look great once you finish.
Sometimes, the right answer is to take a deep breath and undo your work.
However, the response to that answer is never to just take the work off your needles and yank on the yarn. That way lies lost stitches, tangles, and sadness.
There are two ways to (more) safely undo your work: unknitting and frogging. Today it’s all about unknitting. We’ll cover frogging next time.
Unknitting
Unknitting (a.k.a. “tink” for knit spelled backwards) is for when the mistake isn’t so far away. You can unpick your work, stitch by stitch.
Hold the work facing the row you’ve just worked. That is, if you’d just completed a RS row, hold it with the RS facing and the working yarn hanging off the left-hand end of the stitches you want to undo.
A lot of tutorials suggest you turn it around—don’t do this! You’ll have an easier time if you’re looking at the stitches the way you were looking at them when you made them, and have the yarn positioned how it was when you made the stitches.
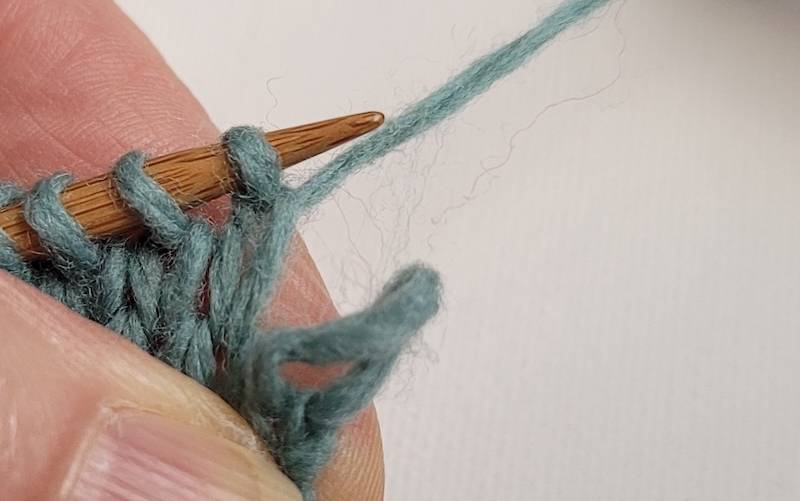
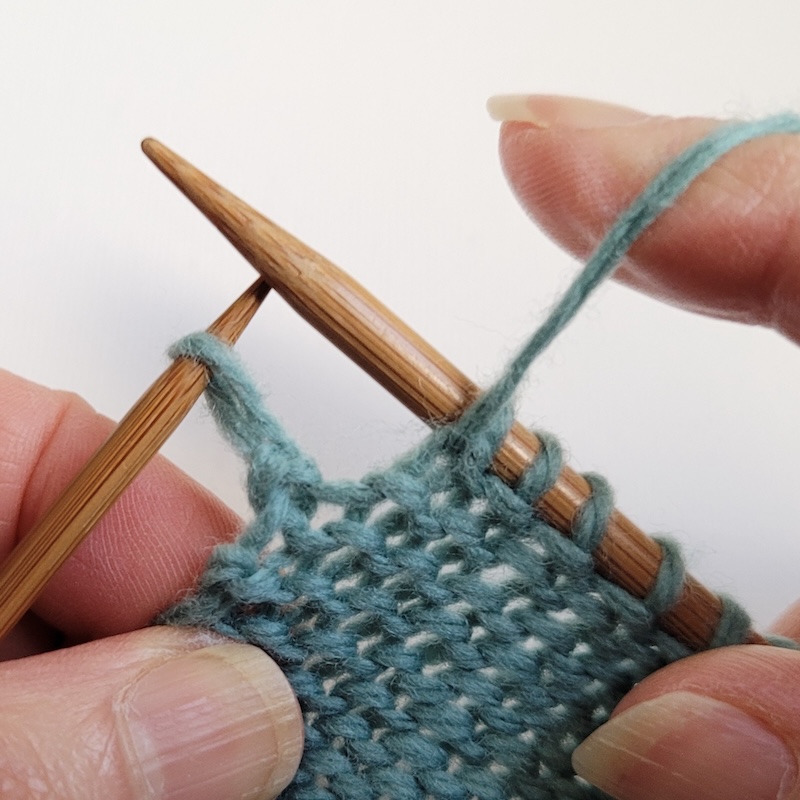
With your empty needle in your left hand, put it into the front of the loop of the stitch below the one on the needle. Let the stitch slip off the right-hand needle and gently tug on the yarn. One stitch undone, and it’s on the left needle correctly seated, right-leg forward.
And keep going.
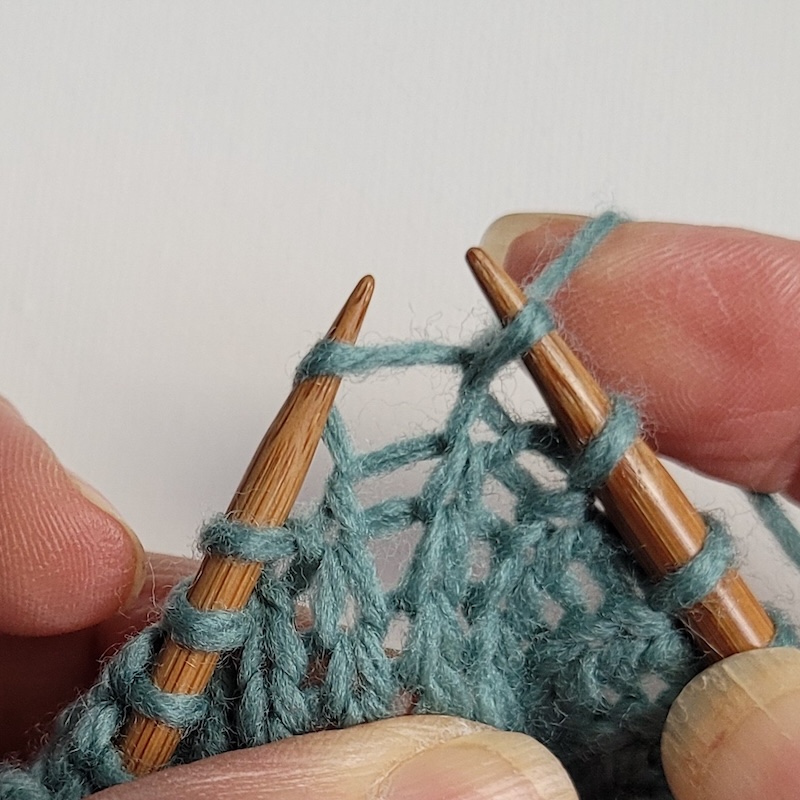
If you’re undoing a purl stitch, make sure the yarn is in the front and pull it up a bit so you can see where the needle tip is to go. I also find it helpful to tug on the fabric, too. Do whatever you need to do so you can see the loop where the needle tip needs to go. Your fabric won’t break, I promise!
Start/End of Row Stitches
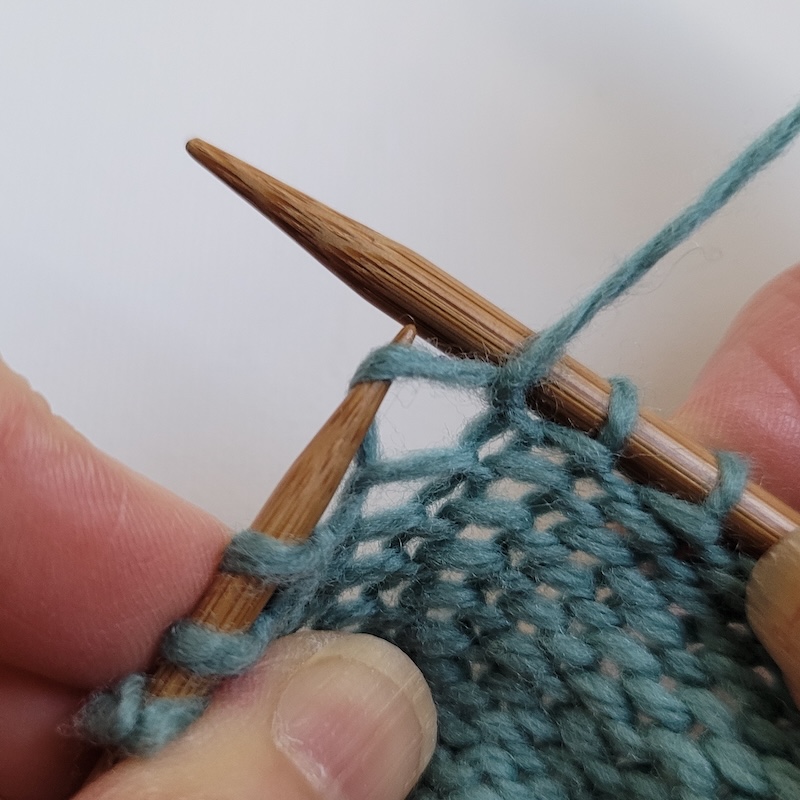
It gets a little trickier at the starts/ends of the rows. Those row-ending stitches tend to twist and tighten up, and unknitting them is hard. I just pinch the fabric between my thumb and index finger, tug (gently, always gently) on the working yarn until a stable and tidy loop reveals itself, and then pop that on my left needle.
This usually means that when I’m undoing a whole row, I overshoot by one stitch.
Remember that the edge stitches have been worked twice in succession: once at the end of the row and then again at the start of the next, after the turn. And so when you undo, you usually end up undoing both “goes” at the same time, meaning that you’ve undone last stitch of the previously-completed row, and you’re one stitch away from the end.
That’s fine! Turn your work around, so that the working yarn is hanging off the right-hand needle and the newly released stitch is on the left-hand needle, then knit or purl it as required. Trust me: this is much easier than trying to neatly unpick just one row of an edge stitch!
Decreases and Increases
If your fabric has stitches other than just knit and purl, then you will need to pay a bit more attention, but the same process works. For k2tog and p2tog, putting the needle into the stitch as you would for a single stitch releases both of them, no problem.
For a left-leaning decrease, or a double decrease, you’ll likely find it easier to do the “pinch, pull and grab” that you use for end-of-row stitches. If you’re pinching the fabric just below the stitch you’re undoing, it won’t unravel further and you can quickly grab the undone stitches’ loops. (Putting the needle into these decrease stitches can result in stitches ending up on the needle out of order, or twisted, or both.)
Most increases don’t need anything special: just let the increased stitch slide off the right-hand needle and tug on the yarn. If it’s a kfb, just let that “b” part of the stitch drop, and undo the first step, the “kf,” as for a normal stitch.
Tips
- Clip a removable stitch marker in the stitch you’re undoing, a row or two below. That way if it drops, it’s safe and you can ladder it back up again.
- Also, you might find it easier to do this unknitting with a smaller needle. Just remember to change back to the correct needle size for working.
Love this article? We love bringing it to you! MDK’s free daily content is made possible by your purchases from the MDK Shop. Take a look around. Browse our Sale page here. Thank you!
Great article Kate!
Thanks so much for a very timely article. I have to tink back a quarter of a row of a project because I mistook a fat split in my yarn for an actual stitch. Ggggrrrrrrrr. I would love if you would also post some videos. I am looking forward to the next article.
I recently completed a cable sweater and posted photos on fb. At which point I spotted a cable I’d twisted the wrong way near the beginning of the back! Some of the, very kind, comments suggested redoing the cable. One suggested doing an i-cord, picking up stitches from the cable and carrying them across the correct way. Yeah. Right. I’m planning on putting one of those ‘handmade with love’ labels on top of it. I know when I’m beat. But it would be lovely if you could cover that scenario in this series?
My aunt taught me how to knit when I was 8. I taught myself to do this, not at 8(!), but years later. I can confirm it works well!
I’m a new knitter and mistakes happen! I feel that one of THE most important skills I can learn is to be able to fix these mistakes. This is not easy— you have to really understand stitch anatomies. So many tears. Thank you for this article!
Thank you for such a clear description. I have a project waiting for me to tink back a bit. This info will definitely help.
The fact that I can tink as fast as I can knit tells you everything you need to know.
I am glad of having that skill in my toolbox when–once again–I stop lying to myself (the I will never notice that mistake when the project is done lie) and admit that I need to put it into reverse before going forward.
Excellent advice!
I always check, double check, and triple check that my stitches go back on the needle mounted in the correct direction. Particularly when unpicking a cable twist or a decrease (especially SSK) it’s easy to mount the stitch backwards.
If the stitch is mounted wrong the original error will be replaced with a dreaded twisted stitch.
Do you know that if you come to a stitch mounted with the left leg forward, you can knit through the back loop? That will untwist your stitch while you are knitting it. (Assuming you’re on the knit side of the fabric.) Same works for purl, purl the reverse mounted stitch through the back loop.
You can usually tell when the stitch mount is off, because it feels tight when you’re trying to work the stitch.
I’ve been knitting 50+ years, but never knew (or even thought about) the edge-stitch issue while tinking! Thank you.
People sometimes ask long-time knitters what keeps us interested in the craft, and I usually say it’s because there’s always something new to learn.
I just tinked back a project four rows and wished I had this article then! I ran into a few of the issues you describe and while I figured them out I will be much better prepared next time!
Thank you
The edge stitches have always been a problem when I’m tinking, so thank you very much, Kate! Now I know how to handle those stitches.
I had to do this recently for a v-neck sweater I’m knitting. I didn’t question the stitch count in the pattern as it was written and wound up with more stitches on one than the other. Fortunately, the un-knitting was confined until just one side. I looked the pattern up on Ravelry after I had knitted quite a few rows and learned that other knitters had experienced the same issue. A good reminder to check on these things beforehand.
As always, great clean explanation! to the point.
Ironically, my lace shawl caught on something the Husband and left on the table, and snagged some stitches. Searched for leftover yarn – found) and made a decent attempt at a repair. Decent – because I know where it is.
I’ve been knitting for more than 50 years, and I LOVED this column!!
Your suggestions are FABULOUS,
esp. the great photos accompanying
them!
I’ve been at this art form we call knitting for a loooong time, but I
always read this column carefully
and always learn MORE ….thanks
so much for sharing your great skills.
I love the MDK tips and tricks.
Thank you
Just trying to get back into knitting had a trigger finger and I really love knitting.
I’m working on a shawl that has m1L and m1R. Several rows up I noticed I picked up the wrong color yarn when doing some of these increases. Is there a way to remake these increases if you drop down to correct the error?
I just finished the March Hat (part of Kelbourne Woolens Year of Hats) so many different k p rounds that I tinked several times a whole round bc I’d missed the correct count near the beginning. I’m grateful to @pdxknitterati for teaching me to tink! And tinking was worth it – the hat came out lovely!