Techniques
How to Work Ladderback Jacquard
In March, I wrote all about why ladderback jacquard (or LBJ) is my favorite solution to long floats in stranded colorwork and promised to come back and teach you how to do it. So here we go!
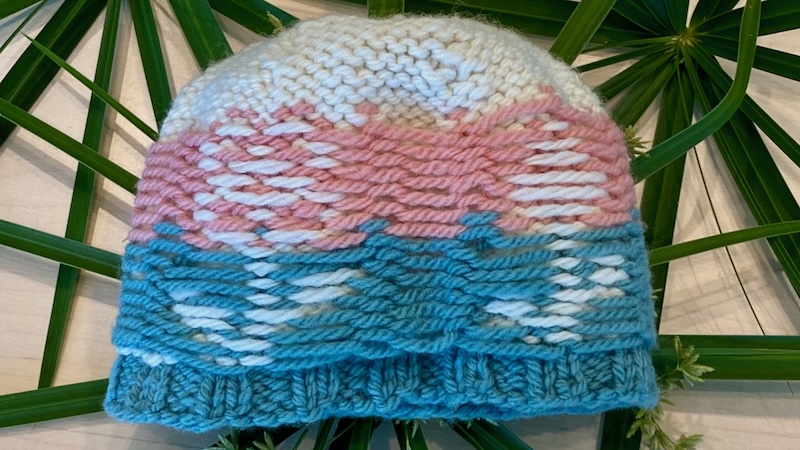
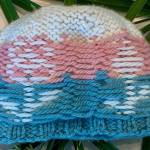
To start with, you should have on hand a piece of stranded colorwork with a long float, which is a section where one of the colors isn’t needed for a while.
Hold your yarns whichever way you’re used to doing when you work stranded knitting: one in each hand or both in one hand. As with all stranded knitting, remember to spread the stitches out on your right needle frequently to prevent puckering.
Setting Up a Ladder
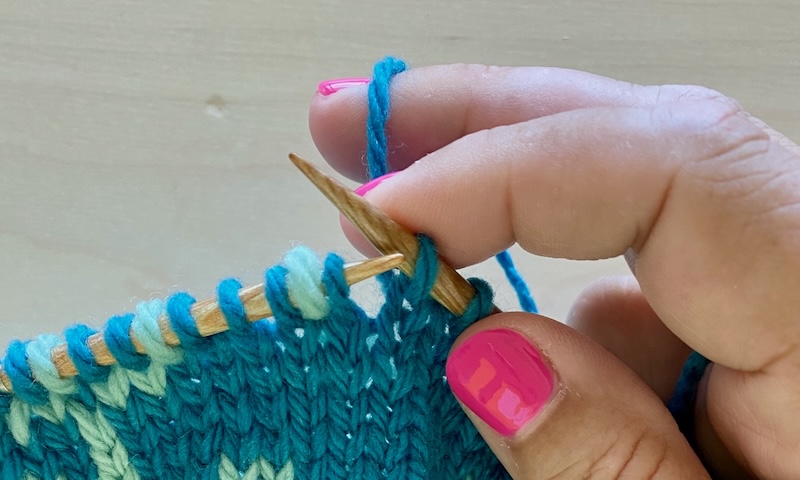
Knit to where you would normally catch a float, and instead, work along with me:
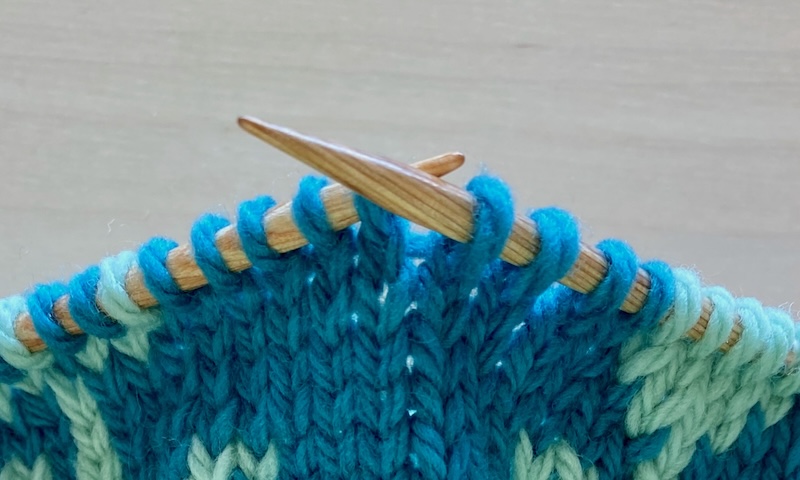
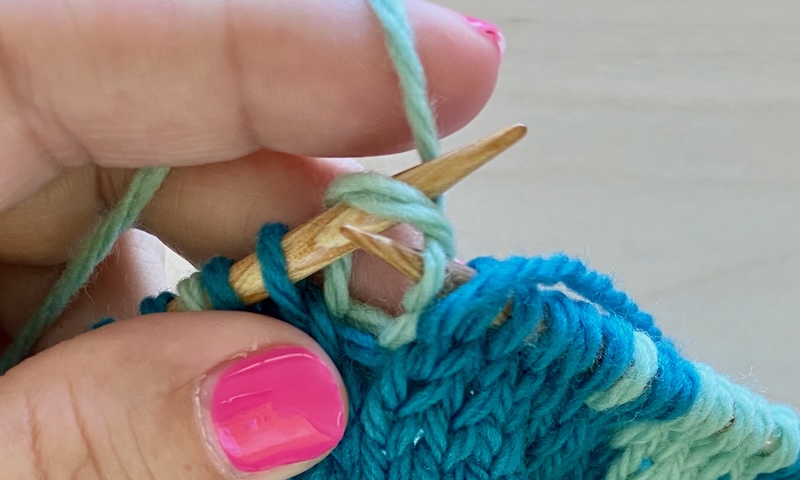
Two-color knitting in the middle of a long single-color section with stitches spread on right needle
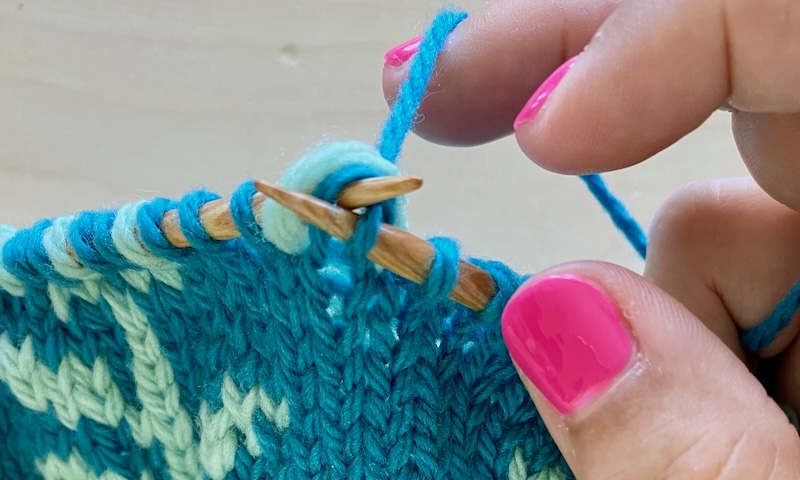
1. Move your main color yarn (the color of the current stitches you’ve been knitting) between the needle tips to the front of the work.
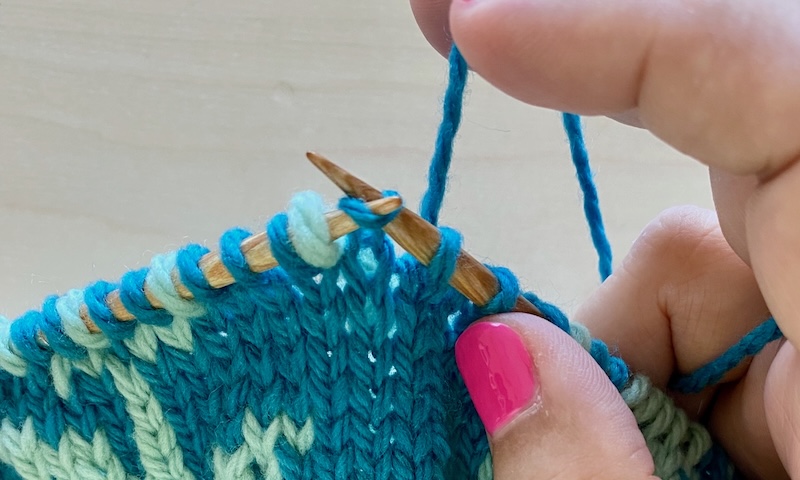
2. With your contrast color yarn (the one you’re not knitting with currently), cast a single stitch onto the right needle using the backwards loop/e-wrap cast-on.
(If you’re not familiar with this cast on, just pick up the working yarn, twist it into a loop, and mount it on the right needle.)
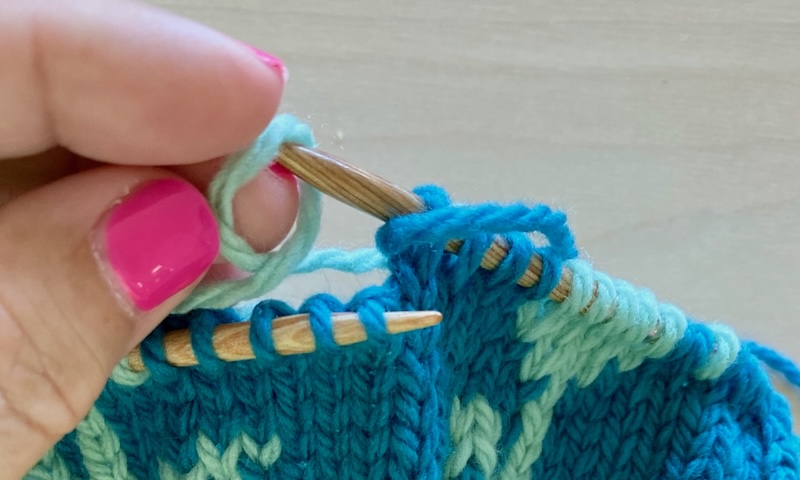
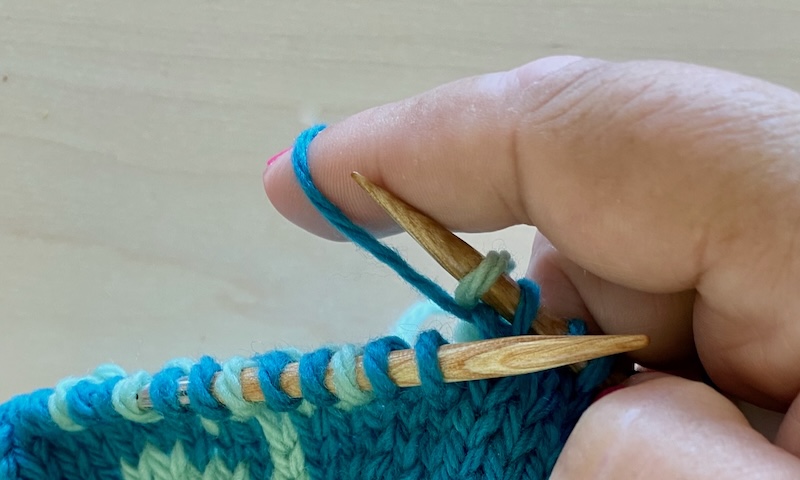
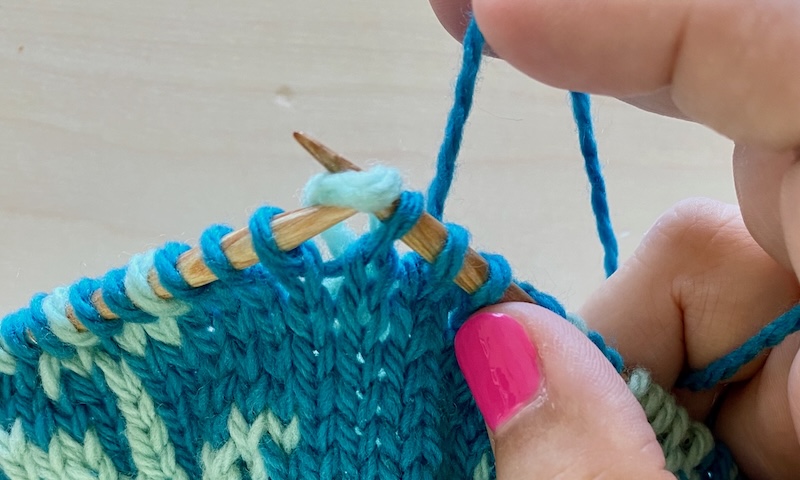
3. Return the main color yarn to the back of the work by moving it between the needle tips, and resume knitting. This traps the contrast color stitch you just made at the back of the work, behind the main color yarn. That’s what you want.
For the rest of the round, each time you come to a place where you would have caught your float, instead work steps 1-3 again. If you have a very long section of one color and you need another ladder before using your contrast color yarn again, go ahead and put more than one in. Put them in as often as you would normally catch your floats.
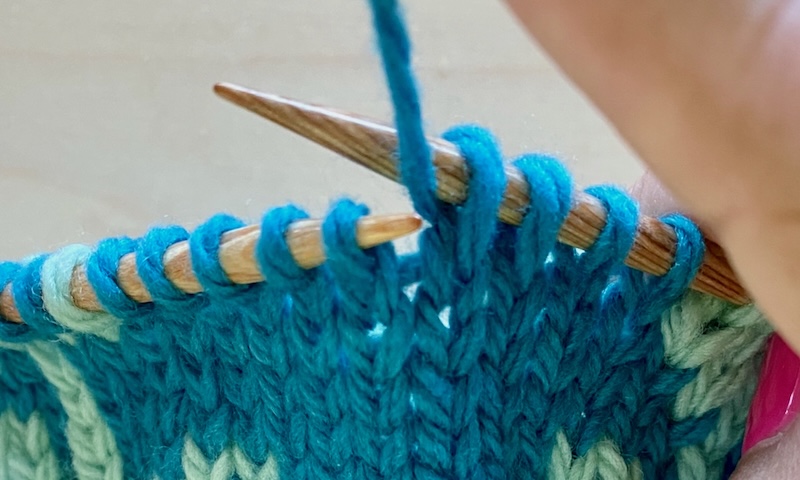
If you’re in a section where the color of your foreground/contrast changes, no problem! Just work the steps using whichever yarns are the main color and contrast color in that section.
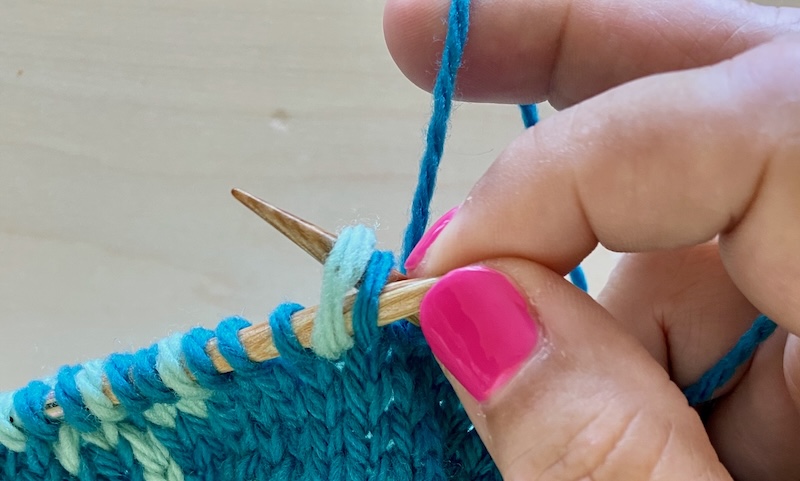
setting up ladder with a New main color and contrast color
Returning to Established Ladder Stitches
When you encounter the ladder stitches again on the following rounds, work them as follows:
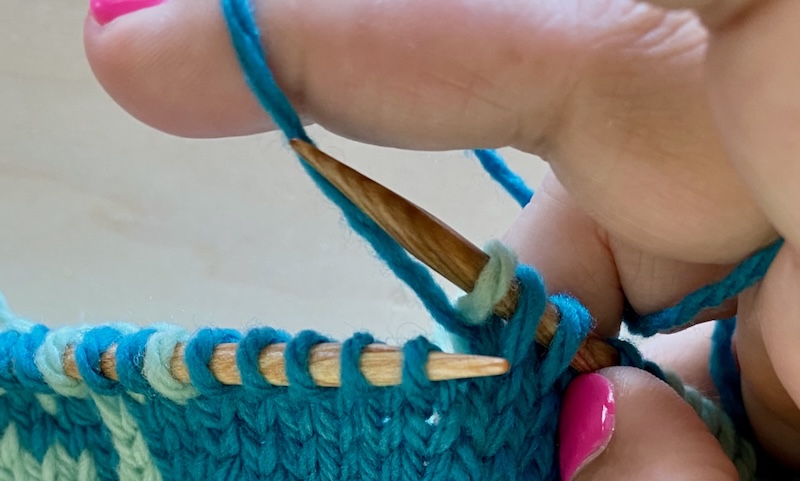
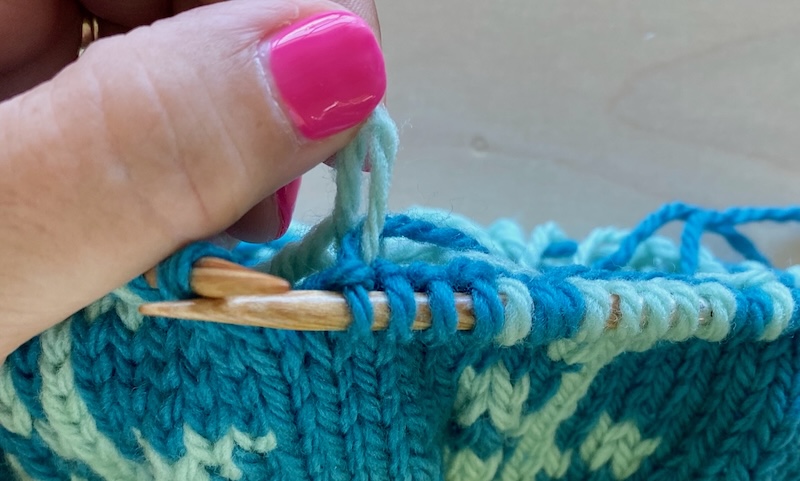
1. When the ladder stitch is the next stitch on the left needle, move the main color yarn between the needle tips to the front of the work.
2. With the contrast color yarn, knit the ladder stitch.
3. Return the main color between the needle tips to the back of the work.
As you work more rows, you’ll see the characteristic ladder forming behind your work. But like magic, none of those stitches will be visible from the front. The only sign of the ladders will be the top stitch that sits on your needle—on your needle, but not in your fabric.
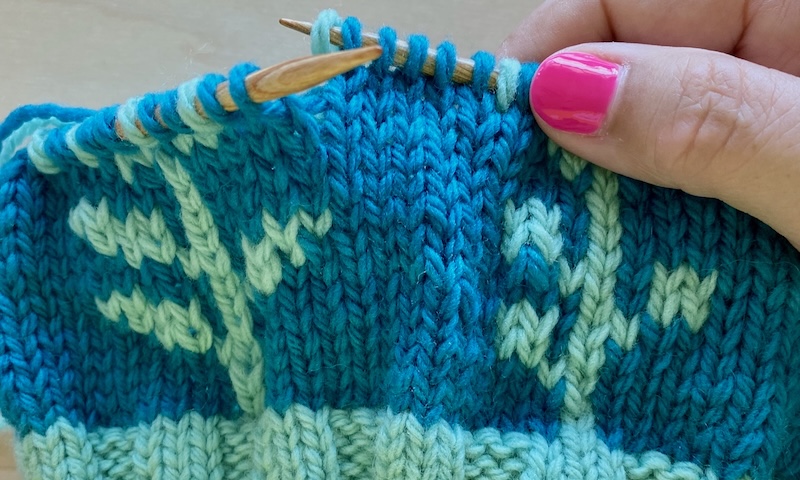
The reason the ladders aren’t visible in your fabric is that they aren’t part of the fabric at all. Moving the main color to the front of the work before knitting the ladder stitches keeps them out of your fabric and forces them into an unattached mesh that remains at the back.
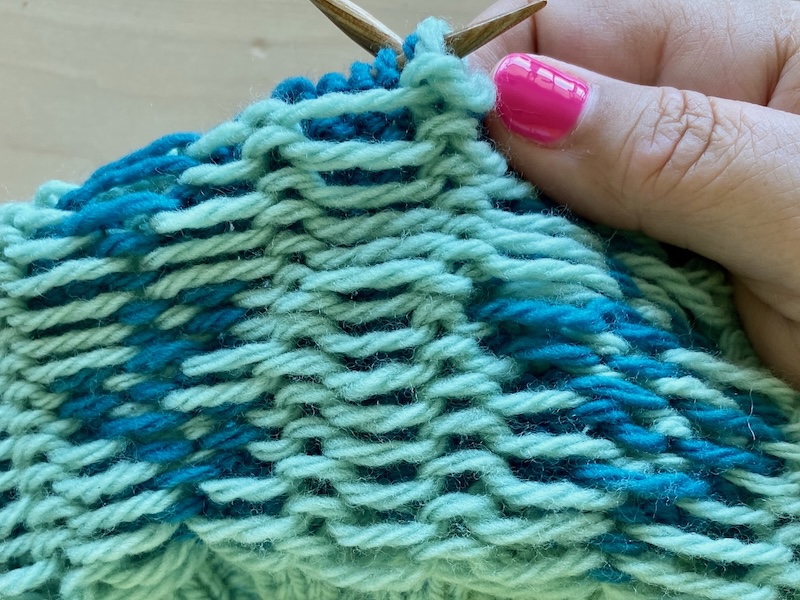
Eventually, we’ll have to anchor that mesh to the fabric when it’s time to finish off the ladder.
Finishing Off a Ladder
When you don’t need your ladder any more, either because you’ve stopped using your contrast color or because the pattern has changed and the motifs are now closer together, you’ll finish it off with a decrease that locks the top of the ladder in place and connects it to the work.
This is the only place in the process where the ladder has a chance of showing, because it’s the only place it’s connected to the fabric. It’s at worst no more visible than a caught float and when worked carefully, it’s invisible.
The following steps are worked using only your main color:
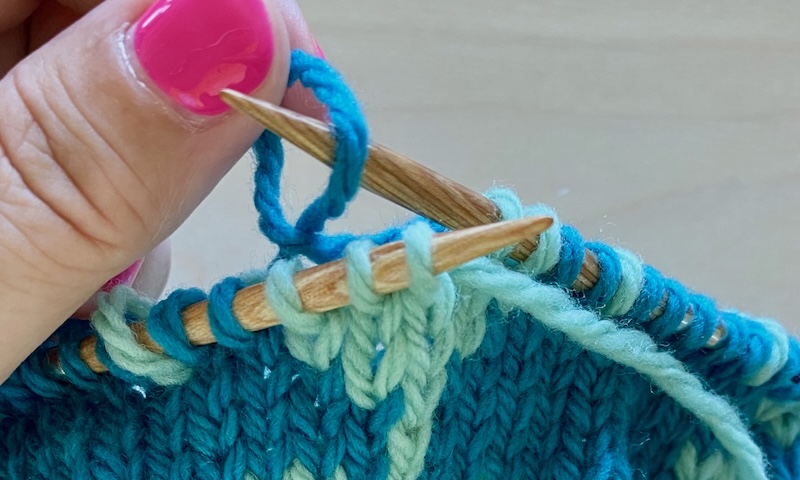
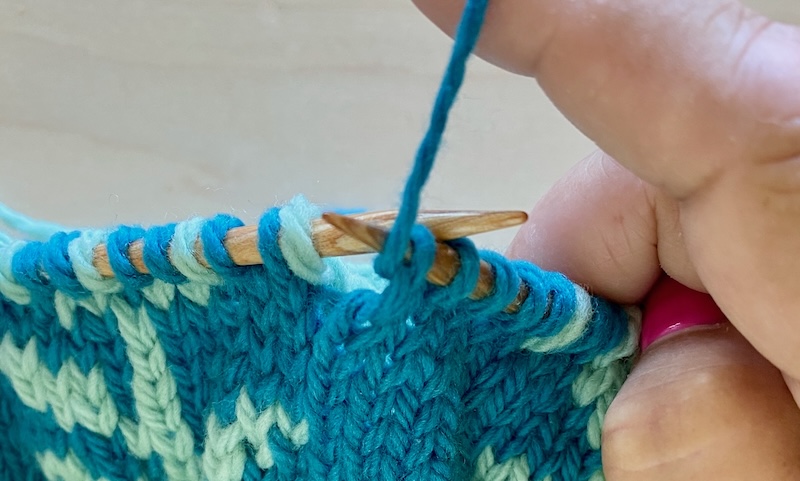
1. Knit until one main color stitch remains on the left needle before the ladder stitch.
2. Work an SSK using the main color stitch and the ladder stitch: Slip first stitch as if to knit, slip second stitch as if to knit, place them back on the left needle, and knit them together through the back loop.
3. Finally, pull the ladder stitch away from the back of the work from behind.
That’s it! Your ladder is finished.
You’ve now unlocked the secret to working across long sections of colorwork without catching floats, added better stretch to your colorwork by virtue of the knit stitches in your ladders, and hopefully avoided all peek-throughs.
Go ahead and use this wherever it’s useful, whether that’s in a small section of your work or the entire thing. This is one of the most flexible techniques you’ll find in knitting. You can use ladders for just a couple of rows or work them for the length of a whole project. You can add many ladders or just a few.
I hope this technique is a game-changer for your colorwork knitting!
Wow! What a great technique to add to my tool box. Thank you Amy!
I love this technique. my question has to do with yarn weights. would this LBJ work with ALL weights or yarn weights?
Yes it does.
I used this technique with aran weight yarns. It worked perfectly, but is a VERY warm sweater!
Yes, the technique is equally applicable to any weight of yarn.
If you were using very different weights of yarn *within the same project,* your colorwork would look unusual, but that’s not to do with LBJ.
I’m not Amy, but yes it would. I am working on a DK vest using it. The only place where I’d be concerned is if the stitch gauge is so wide open (think some of the Ranunculus tops) that you’d see anything that is carried on the inside.
Thank you- clear and concise instructions. I feel ready to tackle this now!
This just blew my mind! Definitely will be using this tip.
Easy to follow directions, thank you!
This is the clearest and most concise explanation of this technique that I have seen. Bravo!
This is a colorwork technique I have been meaning to try. I might reknit the Alaska hat with ladderback jacquard.
Thanks for a great tutorial!
OMG I feel like the sun just came out after a storm. Thank you!
I took an online class with you a year or so (maybe a bit more) ago and Ladderback is a game changer! I managed to take a slipover pattern to make a holiday vest, drafted my own Christmas tree motif (inspired by Pernille Larsen’s Snow garments for adults and children–she didn’t have a vest for adults so I had to design one myself!) and successfully managed the design–sure wish I could post a photo. I then added snow on the branches and in the sky in duplicate stitch because life is too short to wrangle three colors of yarn for 6″ (not to mention it would be too hot to wear indoors!). Saving this article and may even print it out for ready reference. But I’m with you– let’s get to where stranded color work is what people used to do before ladder back came along! Thank you!
I learned to do this from various YouTube videos, they all seemed to have slight variations such as purling the ladder back jacquard stitch rather than knitting it so it is more recognizable as you came to it, doing a m1 to start the ladder, picking up the back loop from the stitch below to start the ladder, k2tog to end the ladder, and so on. It was trial and error to find what worked for me but it was worth the effort, especially with high contrast yarns. I always hated when caught yarns showed through the work, and this really stops that from happening. Your backward loop CO to start is brilliant. I will definitely do that next time!
One suggestion that helped me was to plan ahead and mark up the chart where I would want to place the ladders. Even if the ladder was not needed to catch a stitch for a given round, I maintained the ladder though all rounds, knitting the ladder to carry it up to the next round. Thinking about it, if I did not need to catch the yarn and had simply slipped the ladder stitch from the previous round with the working yarn in front I may not have needed to do an unneccesary stitch. I will try that next time.
I discovered that, when working on hats and doing decreases, if the ladder stitch was in the middle of two decrease stitches, I could move it so that the ladder would be after the decrease (slip first stitch of the decrease as if to purl, exchange ladder stitch with next stitch on left needle, return slipped stitch to left needle, K2Tog or SSK as instructed, work ladder stitch). There was enough give in the ladder to seamlessly shift it to the left of the decrease.
Love this method, I have worked with as many as three yarns in a round with separate ladders to capture each of the carried yarns. It makes a nice squishy fabric.
Kathy, you’re like a psychic — just all of the adaptations and tricks you mention are things I teach in my LBJ classes, including the one I’ll be teaching virtually for MDK on 9/12!
I shouldn’t be surprised; they’re the things knitters have asked about the most over the years that I’ve been teaching this class, so of course I incorporated them into the class material.
Anyone wondering about all of these different tips and different ways to incorporate LBJ, I hope you’ll come to class on Friday. There’s more to learn and more to enjoy about the technique than fit into just this article, and we’re going to have a blast exploring them together!
I second the “mark your chart” recommendation. Especially if one of your yarns is variegated and the color comes very close to the other yarn at times…
Excellent photos and instructions! Thank you!
Wow! Thank you for this. Easy explanation, great close-ups.
Brilliant! Thank you.
Yippee!
Can’t wait to try this technique. Thanks Amy for your clear instructions. Love your work. Beautiful.
Fabulous! Wish I’d known this before!
Just clicked the bookmark button – thank you!
Where is the bookmark button? I would love to save this excellent tutorial. But the only buttons I see are for Facebook and Pinterest, neither of which I use.
Be sure you are logged in then refresh the article page. The bookmark icon should now be next to the FB and Pinterest icons. Once you have a bookmark you’ll find them by clicking “my account” from the dropdown hamburger menu at the top of every page. Hope this helps.
This is such a beautifully clear explanation — thank you so much! Next time I do colorwork, I will try this technique!
Very helpful, and very timely!!! Thank you!
Oooh, I wish this was a pdf! It’s excellent instruction! I’ll be keeping it handy!!
This is genius! Thank you for sharing it with us!
Thank you for your very clear instructions, Amy! I don’t do a lot of stranded colorwork, but this will be great in my toolkit.
Amy- Your mini-class of this technique was excellent. I learned so much from about ladder back and the photos were perfect, clarifying each step.
Thank you so much!
This is just the best thing about MDK, a knowledgable knitter sharing her wisdom.
I think I would love that technique but I’m a person who needs a video. Any chance of that? Thanks
Hi Donna, I hope you’ve seen the announcement about the virtual Ladderback Jacquard I’ll be teaching through MDK on Sept 12. It’ll be recorded and accessible after, so you’ll have an in-depth video to refer back to!
Much needed tutorial. Thank you!
Wow!! This is the most clear and concise way I’ve seen LBJ explained. Huge thanks!!
Thanks
I really appreciate your help and support that may tempt most of us to learn and donate.
I am working on the Pippa tank and this is just what I needed to know!!!!! Thanks so much for your easily understood explanation. I love pictures!!!!! Thanks again.
Hi
Thanks for a good tutorial
Do you have this pattern to practice the Ladderback technique?
Hi Nina,
The pattern is now available, and I agree that it’s the perfect one for practicing the ladderback jacquard technique. It’s called the Bloomlings hat, and is available on my Ravelry and Payhip shops.
And even better, the pattern is included free with the virtual ladderback jacquard class I’ll be teaching on Friday, September 12 here on MDK, along with a forever recording of the class to refer back to.