How To
Ask Patty: Let the Tool Do the Work
Last month’s column (in my mind titled Gauge: The Lying Liar Who Lies to You) explored when and why your gauge swatch might be lying to you. One thing that always signals a “liar swatch” is when a knitter mentions “relaxing into their project”—meaning they settle into their real gauge.
But what about a gauge that changes back and forth throughout a project? This brings us to the promised Part 2.
Part 2: Consistent Stitches—Let the Tool Do the Work
In my Improve Your Knitting class I start by talking about a few basic no-nos when it comes to stitch sizing. In today’s column I’m going to touch on the most important aspect of creating your perfect fabric: a fabric that will have a consistent gauge throughout and that won’t change based on your stress level or your caffeine (or cocktail) level, because you are letting your tool do the work.
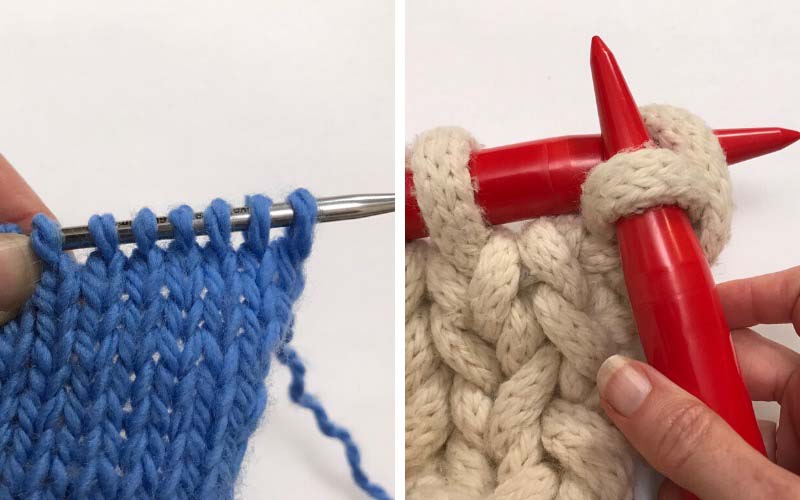
The humble knitting needle is the perfectly designed tool to create the perfectly sized stitch every, every, every time, but we have to use every part of it correctly to create a perfect stitch.
- The tip is unsized but there for a reason.
- And the shaft of the needle is what sizes your stitch.

Your needle’s shaft is your measuring cup. You wouldn’t bake a cake by just eyeballing the ingredients, so don’t eyeball your stitches! (image courtesy of charlotteslivelykitchen.com)
Two letters from knitters experiencing gauge frustrations demonstrate different sides of the same problem: not using the measuring cup.
Case Study #1: The “Grab and Go”
Hi Patty,
I am a very loose knitter. So loose that I still can’t get gauge when I size down to US 3 (3.25 mm) when the pattern calls for a US 7 (4.5 mm). I know the trick (thanks to your video sweater classes) of knitting a different size with my gauge, and I’ve gotten good at the math, but it’s a PAIN. I’d like to know WHY I have this issue. I really don’t understand. Also, my swatch is a waste of my time since it never matches my knitting. As Joss Whedon would say . . . GRR, ARG!
Janet
Janet might suffer from the dreaded “grab and go.” A grab and go knitter is not using the tool as it was designed to be used. She is using the tool only to reach through the old stitch and grab some yarn and pull it through to the right needle, but not to size the new stitch.
This is similar to reaching into the flour with the measuring cup and bringing up a big heaping cup of flour but then not leveling it off.
The telltale sign of not using your needle to size your stitch space under the needle.

Here you can see that I could stick a whole other needle in the space beneath the stitches on this sample I knit using US 6 (4 mm) needles and the grab-and-go method.

To tell what size needle really fits those stitches, I can back it up to the cable and try changing needle tips until I find the size that slides in with no resistance and no space underneath. In this video, you see me trying a US 7 (4.5 mm), US 8 (5 mm), and finally we see these stitches—that I knit on a US 6 (4 mm)!—fit a US 9 (5.5 mm).
So how, you might ask, could I have created stitches that fit nicely onto a US 9 (5.5 mm) needle with a US 6 (4 mm) needle?
By working the stitch on the wrong part of both needles.
Here I have filmed myself “grabbing and going” both for picking and throwing. Take a look and notice where the old stitch sits on the left-hand needle and what happens to the new stitch on the right-hand needle.
The stitch I’m about to work is still on the shaft of the left needle. So now, even if that stitch was sized properly the row before (which it wasn’t), I would be stretching it out twice its size. The reason our needles have a lovely tapered tip is so we can advance the stitch we are about to work to the tip of the left needle, giving us room to enter it with the tip of our right needle, without distortion.
The reason needles come in different sizes is so we can wrap the yarn around the shaft of the right needle to create our new stitch sized to the right needle. Now you might think you can pull that stitch loosely through and—once it’s on the right needle—give a yank to the yarn to tighten it up. But that only lifts up the legs of the row below. There’s no crying in baseball and no tugging in knitting.
So, what is the secret to a perfectly measured stitch? Advance the old stitch to the tip of the left needle. Now you can enter that stitch without distortion, wrap your yarn around your tool and—with even tension still on your yarn—pull (if it’s a knit) or push (if it’s a purl) the new loop through the old loop and size it to the shaft of the right needle.
But what about the too-tight knitter? How does that work?
In the MDK Shop

Case Study #2: The “Tip Worker”
Dear Patty,
I have a question about my gauge. I’m a really tight knitter. I’ve always been really tight. I usually have to go up 2 or 3 needle sizes. I can’t work on wooden needles at all because it hurts my hands, so I always use metal. I know I must just tension my yarn really tight, but I’ve gotten used to it. The issue is my tension always changes during the knitting. Some spots are looser and some are tighter. I don’t get it, because I feel like I tension my yarn the same way so how can this be? HELP.
Tighty tight tight Natalie
Natalie may very well be what I call a tip worker. A tip worker is working the old stitch off the tip of her left needle all right, but she is also sizing the new stitch to the tip of her right needle. This is why after a few stitches are formed, and they are shoved down onto the shaft of the right needle, they feel so tight.
You can also see how it would be difficult to maintain a consistent gauge, since the size of the stitch will depend on exactly where on the taper of the needle tip you choose to make your stitch.

Enlarged to show tipture
Watch me exit the stitch on the tip and you’ll see why the tight knitter is sooooo tight. Kind of like taking that 1-cup measuring cup and just eyeballing ¾ of a cup each time.
Watch me create a few stitches, in both picking and throwing, advancing the old stitch to the tip of left needle and sizing a new stitch to shaft of the right needle. Notice that the yarn wraps 360 degrees around the needle with no space underneath.
For those of you who have taken my live class (now live via Zoom every month on my website) “Build a Better Fabric: Perfect Your Knitting,” you know there are many other tips to create the perfect stitch. Beyond the measuring cup, we also talk about preloading, virgin legs, the Pez Dispenser, the grocery store conveyor belt, and the exit path (sounds like a fun class, right!), but the most important of all of the tips is the measuring cup.
It all breaks down to these simple steps:
1. Advance the old stitch to the tip of the left needle.
2. Enter the stitch and wrap the yarn.
3. Pull (knit) or push (purl) the new loop through the old loop with even tension on your yarn.
4. Size that new loop to the shaft of the right needle and exit.
By letting your tool do the work, no matter what the weather is, no matter how many cups of coffee you’ve had, no matter how annoyed you get at your coworkers forgetting to mute themselves on Zoom for the millionth time, your first stitch will be the exact same size as your last.
Now grab your measuring cup, bake yourself a cake and knit the perfect fabric!
Hi, Patty. Forgive me if I’m looking in the wrong place, but I don’t see a Zoom schedule for upcoming “Build a Better Fabric: Perfect Your Knitting” workshops. (I do see the June listings.) Can you point me in the right direction? TIA!
Hi Jacmknits, since my schedule is so packed trying to get ready for Virtual AffiKNITy and teaching at Virtual Vogue Knitting Live, we decided to rearrange the VK Live schedule to include Perfect Your Knitting! It goes on sale today (July 23 at noon EDT)
Hi, I haven’t announced the dates for the next one yet. I got a bit underwater trying to get my virtual retreat ready and my fall video sweater class. If you’re on my newsletter list you’ll get a notification when I announce the Aug dates.
Thank you, ma’am. Again.
Hello!
I love to read your column, andit would make soooo much easier if you *also* use the metric system. When referring to US needles, could you also ad mm in parenthesis? Or meters/grams when talking about yarn length/weight (not the the case for this post). This goes inline with being inclusive: gender, race/ethnicity and… country-inclusive!!! Do you know that only 3 countries in the world use the imperial system, and the rest (about 194) use the metric system? Are these 3 countries the most important ones? Is the knitting (or DMK) community only American or only from imperial system countries?
Please take this as a constructive suggestion, because that is my intension. I am an avid, happy follower of DMK posts!
João
In spite of being an occupant of one of those countries that uses the imperial system, I am finding myself using the metric system more and more. I weigh my yarn in grams, definitely find it easier for weighing exact amounts in baking, and have been trying to use the metric size for needles as that too makes more sense for actual needle sizes. It is a learning curve but well worth the effort, and that learning is enforced by seeing the imperial and metric descriptors side by side.
Oddly enough, as a daily metric user in nearly everything (we adopted metric here quite a while back), I find using imperial measurements (1/8 inch, 1/4, 5/8 inch etc) much, much easier for sewing garments and when quilting.
Since I always use mm in my patterns I checked my original column notes and it looks like I did put the mm in parenthesis for the first couple of needle mentions, but then I missed a bunch. No excuse, but my computer died and I lost 1/2 the column and all the videos so I was in a bit of a scramble to redo them before my deadline. Thanks for pointing it out, I’m sure Ann & Kay will fix the ones I left off.
Thank you, Patty, Ann and all, for your understanding and support!
Thanks João and Romneym for pointing this out! We totally agree and have added metrics to the needle sizes. We do include metric measurements and needle sizes in our Field Guides. (We even wrote a post about the joys of metric recently: https://www.moderndailyknitting.com/can-we-talk-about-metric/)
Thank you for saying this Joao! I couldn’t agree more.
I am Canadian and only use the metric system.
I work on many test knits for designers, and I am frequently asking the US based designers to be inclusive of knitters in other countries. This includes providing metric needle sizes (mm), metric yarn requirements (meters and grams), as well as measurements (cm) on the pattern schematic.
Knitting has a worldwide reach and I would be delighted to see a more inclusive approach to our shared passion.
+1 Metric is also much easier to calculate with. I understand Americans are used to what they’re used to but, like the measuring cups*, there are better systems out there and if you have the time it’s great to do both.
(*No matter how well you use measuring cups, they’re inherently inaccurate. Passable for savouries, terrible for baking.)
Dear Patty, I see your point (no pun intended!) but I am one of those loose pickers with gauge problems who could really use a video of exactly how to do what you just said to do. 0therwise, as I don’t quite understand how to do what you are saying, I will slide back into my decades-old bad habits. Thanks!
Did you get a chance to watch the videos? I include a video of me sizing my stitches using the needle in both picking and throwing. I can’t actually teach what I do in a full class in this column, but it gives you a sense of what you need to work on. I also cover this in my video class “Improve Your Knitting” (link in column).
I believe the last video in her article demonstrates the correct way. The videos are a great help! I need them also 🙂
Huh, well I am just here with appreciation. I am a super-loose knitter (but have just coped with it, and love the things I make) and I am excited to try this approach to solving the problem! Since I’m not inclined to be relaxed in the rest of my life I’ve always wondered why my hands seem to be relaxed, maybe this is the answer! Thanks!
Patty, another great post. Been
following for years and my knitting has become much more consistent as a result. And I love love love your analogies!
I know a couple of loose knitters who don’t tension their yarn by wrapping it around a finger. Instead they hold it in between the thumb and index finger. They knit very quickly, but don’t have as much control over their guage.
In interest of full disclosure, that’s the way I hold my yarn when I throw. You can actually get perfect tension that way. It’s all about using your needle to size your stitch, and keeping and even tension on your yarn when you exit your stitch. The problem comes when you drop your yarn after each stitch.
Amen, double amen!
Thank you so much for this column!!! It was very helpful, I’ve been struggling with gauge issues all Summer.
This is fabulous! Thank you so much for this. My gauge used to be very consistent but has been all over the place for some time now. It’s been very frustrating and discouraging. I recognize exactly what I’ve been doing in your videos. Thank you so much, I’m really looking forward to knitting being enjoyable again!
This was awesome! I’m a self-taught, relatively new knitter. Very helpful!
OMG this is so true – I’ve done both/all the mistakes. This is so freaking true!
What a great column! It was a ‘knitting epiphany’ (knipiphany? that works!) for me when you mentioned this in passing in the Tips & Tricks workshop in Dallas for the Dallas Hand Knitter’s Guild last year. I latched onto it and implemented, although I did still have a nagging doubt that I was getting it exactly right, so now with the video I know! My consistency has improved and it was actually easier than what I’d been doing!
Patty, I am a loose knitter as well. At one NY Vogue Show you changed my life by telling me to use a smaller needle (one size down) when I purl! I got gauge and it makes life so much simpler! -Karen
Thank you so much for this!! I had never noticed my grab-and-go tendencies but this explains so much!
Thanks for the reminder. I’ve saved this article. I know you covered this before but I needed the refresher!! Old habits are hard to break.
I’m such a grab-and-goer, and I had no idea. My stitch gauge is always loose, and row gauge always too small. I like the fabric I’m getting and I’m consistent, but yeah it would be nice to be closer to the recommended pattern needles. Thank you, I will definitely try the sizing trick.
Patty, Could you write a how-to letter about reversing shaping for left and right fronts? I’m knitting my first sweater, a cardigan from Rowan. The pattern states it is a Level 1 and the knittng is easy enough but I cannot understand the reverse shaping. A reply email from RowanKnits was not helpful 🙁 and I cannot find anything on Google. My LYS knit is still under quarantine. 🙂
Sarah
That sounds like a great column. Write me an email – as*********@***il.com
SO helpful! Thanks Patty and happy, healthy new year to you and your family.
Thank you for speaking to us too-tight knitters! I’m trying to knit a stuffed dog for my nephew (I haven’t knit more than a hat so it’s a challenge) and end up with a too-tight swatch about 4 rows into the pattern and I’ve started over about 5 times. Can’t wait to get home and use my needles more conscientiously!
I have been knitting for many years and have been told how tight the fabric was and that I should “try to loosen up a litttle.” Now, at the age of 73YO, I have finally been able to produce a fine-looking peice of fabric. Thank you Patty!
Patty. I can’t believe how much this changed the way I’m knitting. Thank you SO much!!
Hi Patty, I just found your column, it was linked by another knitting blogger @talviknits and thought I’d check this out because I struggle with gauge. I am a tight knitter and I recognized the knitting with the tips issue a while ago and corrected it the way you explain here. This helped me knit more evenly, hut honestly I still end up having to go up needle sizes to get gauge and often that doesn’t even work. I find myself knitting fingering weight gauge with sock or even DK weight yarns on size 4 or larger needles, consistently.
Another time, I knit a project with DK weight yarn that was meant to be worsted and it worked out just fine, and I had more yarn leftover than expected.
I guess I’m wondering, can the properties of the yarn itself lend this much variation in gauge? Do you have a post you could point me to that might give me some clues?
I was having the same problem as Janet. This has completely changed my approach to knitting. Thank you!